2nd Gen Rear HC Bumper Build (Pics)

jeverich

Luddite
Thanks!

Yeah, I'd imagine unless you were opening and closing your swing out hundreds of times per day, you'd never even come close to putting any wear on the bearing..

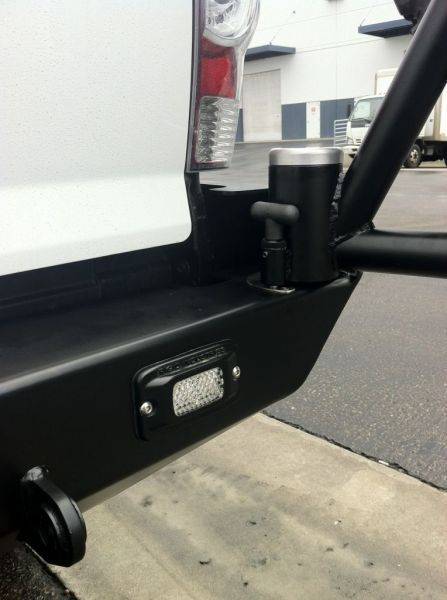
Just put in a couple of Sylvania 168 LEDs in my license plate lights, definitely a good upgrade, something only I'll notice - but accepts a high clearance plate bumper for sure! You should check them out.

Any thoughts about adding reverse lighting?
 

tweeek

Observer
Well Christmas is done an I have settled back into a work routine Unfortunately lol. I rushed to get the bumper ready for our road trip, leaving out some key parts in the process. I finally got started on the gas can carrier.

I have 2x Scepter 20L MFCs to build a home for. Day started out with a trip to get some 14ga sheet.


Cut and ready to bend. I dont have a brake, so Ill cheat by scoring the metal most of the way through, bending to shape, then fill the groove with weld and grind flush ;)


Ahhhhhh tight fit


Now I have this idea for a built in ratchet strap system to hold the cans down via a top plate.

My conditions for the top plate were:
Must prevent theft
Must prevent siphoning gas
Must secure cans from movement in any direction
Must look cool :B


More to come tomorrow :):):)


Sent from my SM-P600 using Tapatalk
 

Glorybigs

Adventurer
Really nice work.
A couple of suggestions...
1. Pick up some heavy duty / truck, door edge guard to finish off your cut off bed sides.
2. Regarding the axle pivot, single shear will fail. Before it fails figure a way to capture the top so it's in double shear.
 

tweeek

Observer
Really nice work.
A couple of suggestions...
1. Pick up some heavy duty / truck, door edge guard to finish off your cut off bed sides.
2. Regarding the axle pivot, single shear will fail. Before it fails figure a way to capture the top so it's in double shear.

Thanks for your suggestions. I had some trim, it worked fine except at the 45 degree angle by the taillights. It wasnt maliable enough to make the bend and wouldnt stay on. I tried cutting it at 22.5 to make the corner but it wasnt very clean looking. I am still searching for a thinner trim. In the mean time, I painted all the edges to keep them from rusting.

As far as the single shear spindles go, I to had the same concerns as you to begin with. I read alot of stories of failed spindles. In all of the accounts that I read, were failures of older style spindles ie; trailer spindles, rockstomper, original comp4x4, 1 1/4" etc. I also think a very important design factor is the contact area on the other end of the swingarm, at the latch. Large dynamic forces can be equalized between the latch system and the hinge.


I saw a thread a while ago, (wish I could find it now) where the owner of, I believe comp4x4, was looking for feedback of their newly designed spindle. They redesigned it due to failure rates of 2-3%. They are using new materials, a thicker base and I have not heard of a single failure of their new 1 3/4" heavy duty hinge.

I used the Summit Machine hinge. It has a massive 2" base to weld to the bumper. I contacted summit directly with questions about install, they had no reports of failures. The company I bought the hinges from is a custom fab shop, mostly catering to bumper/slider builds for Cruisers. He tells me he has personally used more than 40 in his bumper builds with 0 failures. His brother has one with a 37" spare and 2x20l gas cans! I have 1x33" on my spindle. Period. It is securely fastened at both ends to distribute the weight and has zero movement.

I wont be loosing any sleep, but although I have no intentions of finding a way to convert to double shear, I may consider some sort of hidden wire rope teather for a worst case scenario where I am proven wrong and my whole setup ends up bouncing down the freeway :p


Sent from my SM-P600 using Tapatalk
 

tweeek

Observer
Got a few more things done today. Not as much as I had hoped, but I did prove the concept of my integrated ratchet system, though it needs a little tuning.


Swingarm mocked up, now I need to rethink my latch system. I would really like to secure both arms with one latch. I may have an idea :B


Ratchet strap welded on. This took some time as I could only weld very small beads at a time to avoid melting the nylon strap. I kept it wet and it seems fully intact though. (Sorry for the crappy cell pic :()


Bottom support structure tacked up. Ratchet attached and working, but still needs a little tuning. I do plan on tapering the bottom joists towards the front, just to tidy it up.


Still have a lot of rough edges to clean up, and fabbing left, but got a quite a bit done this weekend.

Sent from my SM-P600 using Tapatalk
 

Glorybigs

Adventurer
Comp4x4 is a very well respected name in the business of rear swing out parts.

The axles are not designed for the leverage being put on them with the tire swing out and they will fail, when depends on many variables. I'm not trying to argue a point, I'm stating a fact. Your still in the build phase and by looking at your pivot it appears you could cut down the outer sleeve some and capture the top of the shaft under the bolt with a plate welded to the main corner structure.

Understand many times when these failures occur people don't provide feedback, so lack of accounts is not a good indicator. Look at the top tier fabricators and look how they design their pivots - double shear. Look at off road race vehicles, everything is in double shear. Heavy equipment, same thing. Etc.

I did much of the same research you identified. I also was under the same assumption regarding the latch design limiting movement, in turn minimizing fatigue on the pivot shaft. I did my due diligence and designed my latch with a 1/2" t-handle to tighten down the swing out arm vertically. I also had the arm sitting on a polymer material to keep the weight off the pivot while it was closed. Long story short, it failed in a catastrophic manner.
image.jpg


Do what you think best, I'm not going to post in your thread again regarding the subject. It just looked like you were taking a lot of effort to do things right and I wanted to try to help you out.
 
Last edited:

tweeek

Observer
The axles are not designed for the leverage being put on them with the tire swing out and they will fail, when depends on many variables. I'm not trying to argue a point, I'm stating a fact.

We obviously have differing opinions on what is fact, and that is okay, but not all spindle based hinges fail. Trailer axles are not designed for the leverage no, but many options on todays market, AtoZ Mega Spindle, Comp4x4 HD, Summit Machine, 4x4 Labs and several others ARE engineered, designed and machined specifically for tiregate hinge application. They are not the trailer spindles off the shelf of yesterday, but fully machined out of quality materials. There are MANY accounts of 1 1/4" failures. I have not seen a single account of a MEGA Spindle (1 1/2") a COMP4x4 HD (1 3/4") or Summit Machine (Technically a 1 3/4, but 2" where it welds to bumper)

Look at the top tier fabricators and look how they design their pivots - double shear.

Here are some top tier fabricators using single shear:


Pilfreybilt
liveGUScAw.jpg


Brute Force Fab
tn_480_56dadf9878d541a58bba2b7f476988ff.jpg.png


CBI Offroad Fab(Trail Rider 2.0: Single Shear. Bushmaster 2.0:Double Shear)
008.jpg


Demello Offroad
2-1.jpg


Cruisin Offroad
t-r-ac5.jpg


Slee Offroad (Cruisers)
sof1128-2.jpg


4x4 Labs (Cruisers) But also sell their hinges.
rubicon80.jpg


Expedition One (FJ's)
57609d1337555549-expedition-one-rear-swingout-bumper-rotopax-20120520_171028.jpg


There is so many more (Espescially with the Cruiser market). If it is FACT that all of these hinges will fail, I will eat my socks.


I did my due diligence and designed my latch with a 1/2" t-handle to tighten down the swing out arm vertically. I also had the arm sitting on a polymer material to keep the weight off the pivot while it was closed. Long story short, it failed in a catastrophic manner.
View attachment 207156

That sir, is a very sexy bumper. I do not see the support under the swing arms in the picture, but the picture is small and it is difficult to tell for sure, but I will trust it was there. If I am not mistaken, and please correct me if I am, this is a Relentless built bumper, and it looks like your hinges are 1 1/4" spindles. They look like either the original Comp4x4 or AtoZ ?

Here is another picture of a beautiful Relentless rear, with tiny spindles:
2012-10-04_16-49-21_234.jpg

Look at the difference in the size of these spindles vs. the one in the Slee offroad picture above.

It just looked like you were taking a lot of effort to do things right and I wanted to try to help you out.

I am very greatful for your help. That is not meant to be sarcastic. I appreciate everyones feedback.
 

Box Rocket

Well-known member
While I've seen a few single shear spindles fail, I do NOT agree that any and all single shear hinges will fail, it's only a matter of time. Like has been mentioned that are numerous single shear seingout out there that get regularly abused and carry significant weight with Massive tires, multiple fuel cans, recover tools etc on them. It is important to use a well engineered, and frankly, one that exceeds the stress you intend to put on it and there are several good options out there. Many that will not fail, its just a matter of choosing the right one and planning well what kind of weight, where and how much you plan to carry on the swingout.

I've been using a single shear hinge (not one of the biggest ones out there) for the past 8 years on my Cruiser. I haven't been easy on it. It has held up nicely.

.


However, I did choose to use double shear hinges from Comp4x4 on my Tacoma rear bumper when I built it. I chose these particular hinges primarly because of cost. They are simple 1" bolts with brass bushings instead of the typical spindle/roller bearing type. But in addition to the cost this face mount design worked best with my bumper design. I share it here not to influence change to the design of the OP's bumper, but just in case others reading the thread are looking for options.

.

.
 

bkg

Explorer
A fiancé driving 20-30 mph down a rough road with the CBI locked in the open position... with fuel and very heave spare on the back... (and witnesses)... tells me the CBI single shear is plenty strong.
 

SGTCap

Adventurer
Well Christmas is done an I have settled back into a work routine Unfortunately lol. I rushed to get the bumper ready for our road trip, leaving out some key parts in the process. I finally got started on the gas can carrier.

I have 2x Scepter 20L MFCs to build a home for. Day started out with a trip to get some 14ga sheet.


Cut and ready to bend. I dont have a brake, so Ill cheat by scoring the metal most of the way through, bending to shape, then fill the groove with weld and grind flush ;)


Ahhhhhh tight fit


Now I have this idea for a built in ratchet strap system to hold the cans down via a top plate.

My conditions for the top plate were:
Must prevent theft
Must prevent siphoning gas
Must secure cans from movement in any direction
Must look cool :B


More to come tomorrow :):):)


Sent from my SM-P600 using Tapatalk

How are you scoring and cutting the sheet metal? I can see being able to the straight sections with a REALLY steady hand and a lot of dremel cutoff wheels, but those curves? Am I missing a simple solution?
 

tweeek

Observer
One of my favorite things about this software is the ability to use a scroll-wheel/3-button mouse to zoom, pan and TILT. I love the ability to tilt the view which becomes pretty nice 3D where they have good resolution (Sedona, AZ and the Grand Canyon are good examples). I was flying over Africa the other day... I love it.

4.5" angle grinder with cutoff wheel for the straight sections. I have a metal yardstick I use to get the first pass straight and square. After that the wheel stays in the groove and cuts incredibly straight. No dremel... that would take you weeks!

As for the rounded sections, no, I had a plasma cutter I was fortunate to borrow from a coworker. You could definitely do this with with a cutoff wheel though, cutout an octagonal shape and smooth the corners with a flap disc on the angle grinder.

Sent from my GT-I9300 using Tapatalk now Free
 

tweeek

Observer
Well I have neglected this thread, but would like to follow up with some pics of the finished product. I replaced the bottom of the fuel can holder with diamond plate for water drainage. And also added a fold down cooking table.


Sent from my SM-N900W8 using Tapatalk
 

tweeek

Observer


Fold down cooking table


Latch for cook table


Hinge for table support legs. A little ghetto but it works. Some real weld on hinges would have been nice, like how the table itself hinges, but I had this crap laying around.


Fueling mode


I extended the handles on the Destaco latches to give a little more leverage so the wifey can operate. Much easier to open and Latch. With the T handle, I can open both swing arms in one motion, by grabbing the top, or just one at a time.


Ratchet mechanism.


Sent from my SM-N900W8 using Tapatalk
 

Forum statistics

Threads
187,411
Messages
2,894,302
Members
228,349
Latest member
Frank Design
Top