Barn Door for JK factory hardtops

jscherb

Expedition Leader
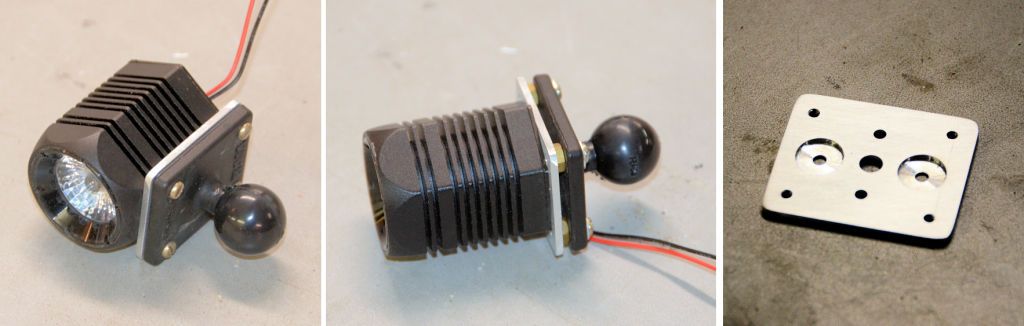
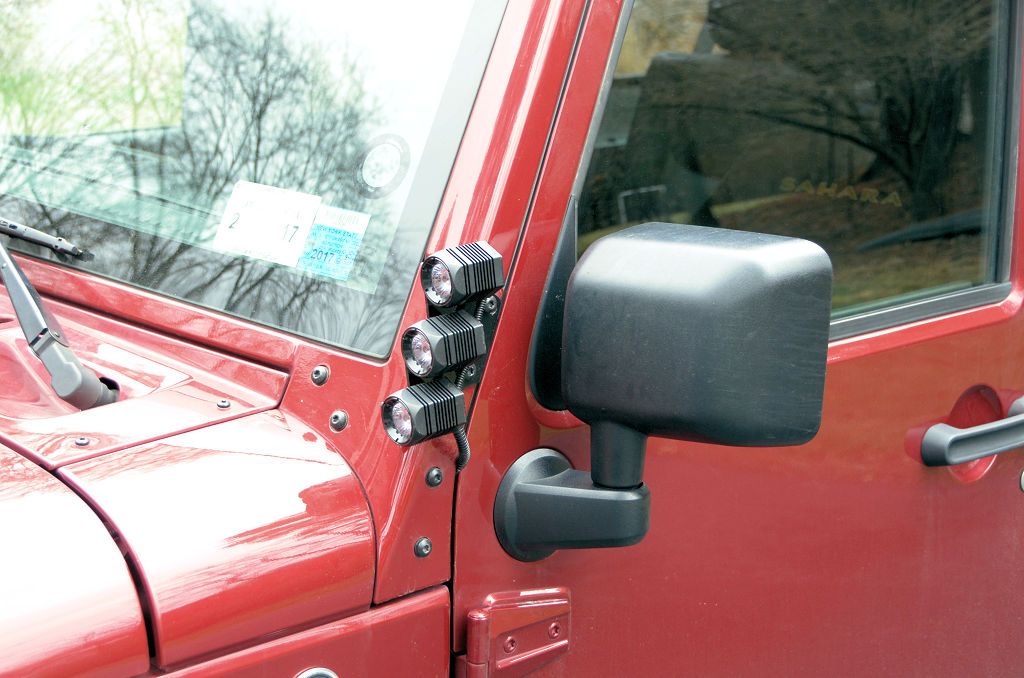
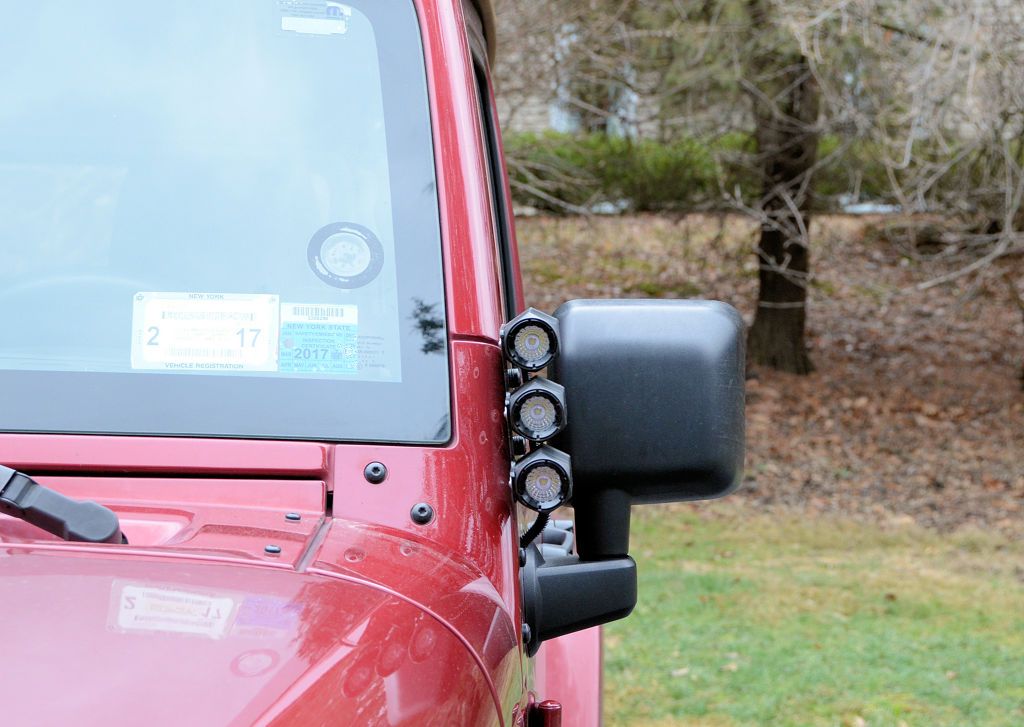
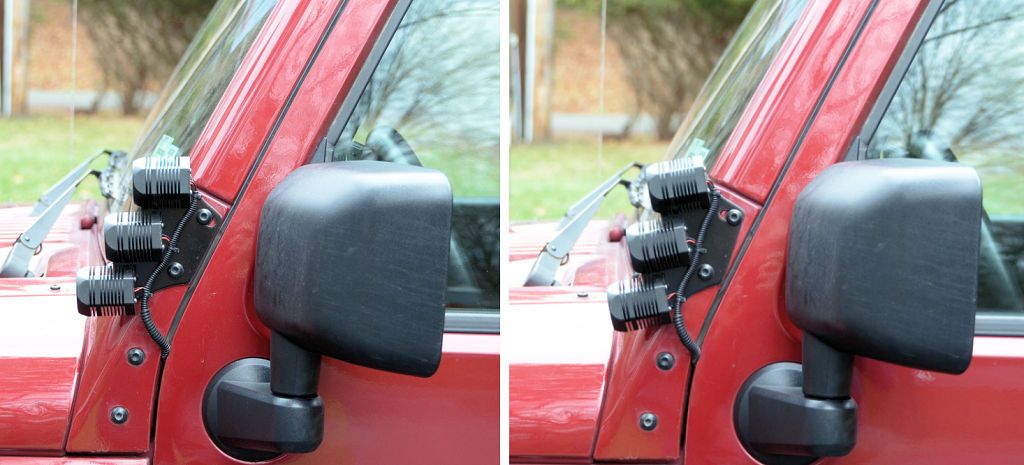
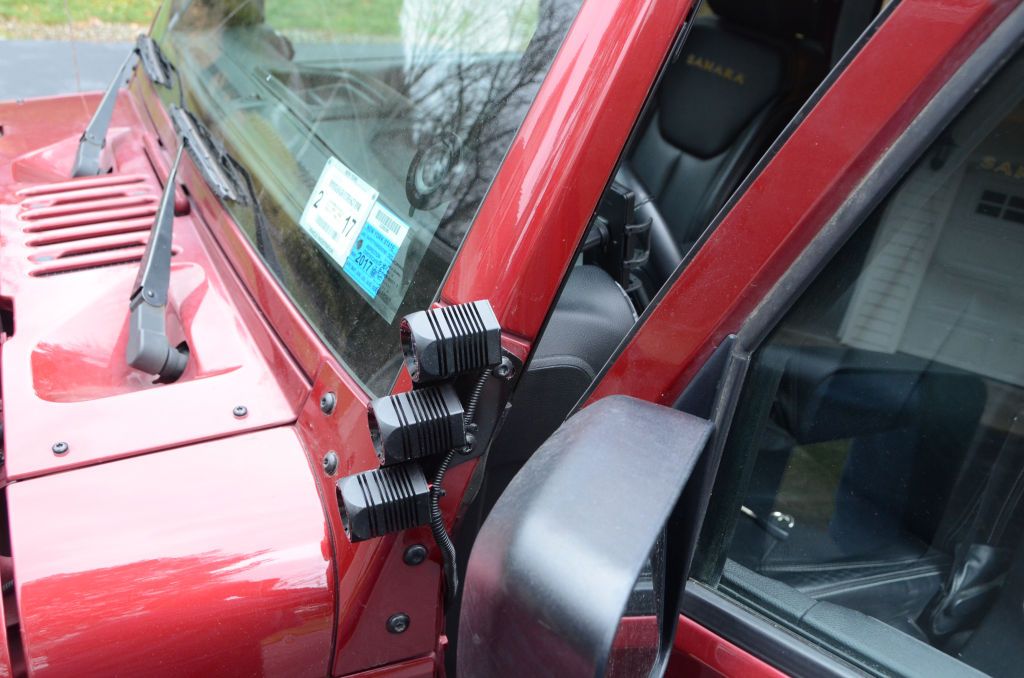
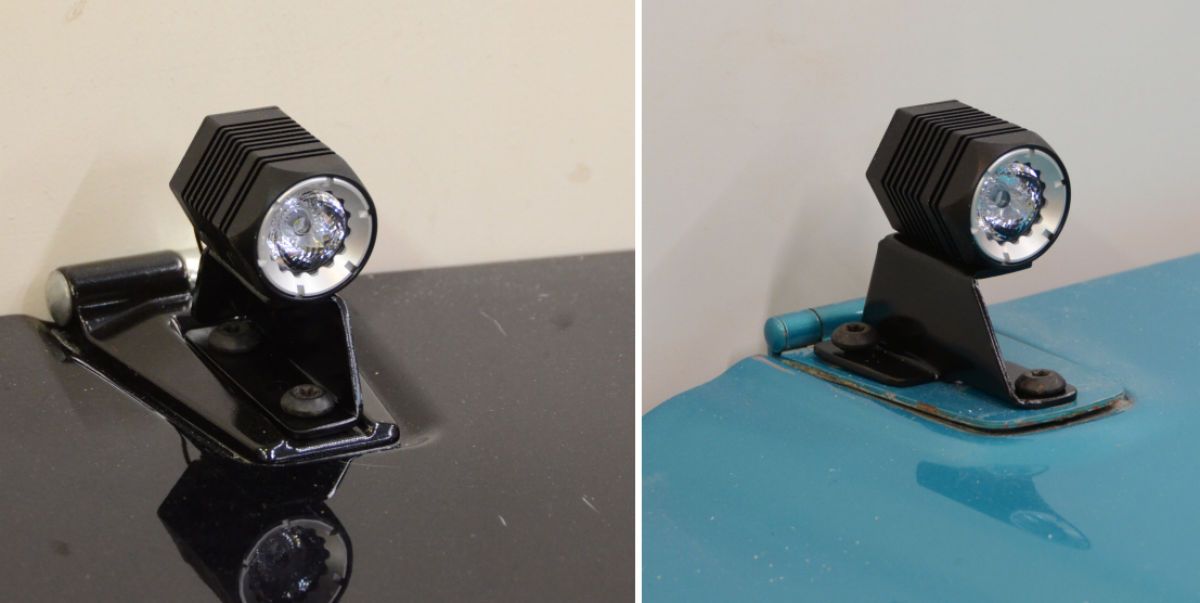
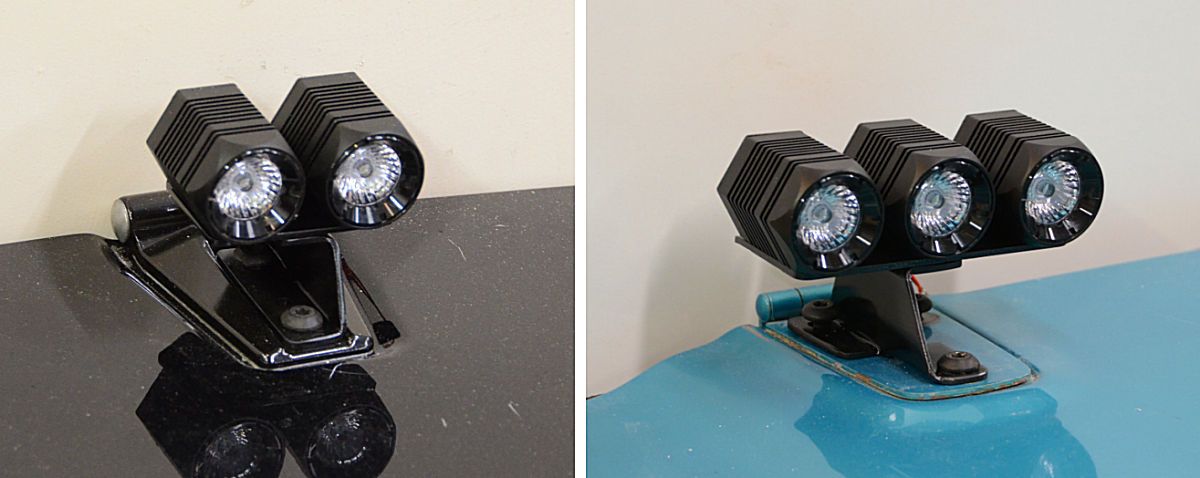
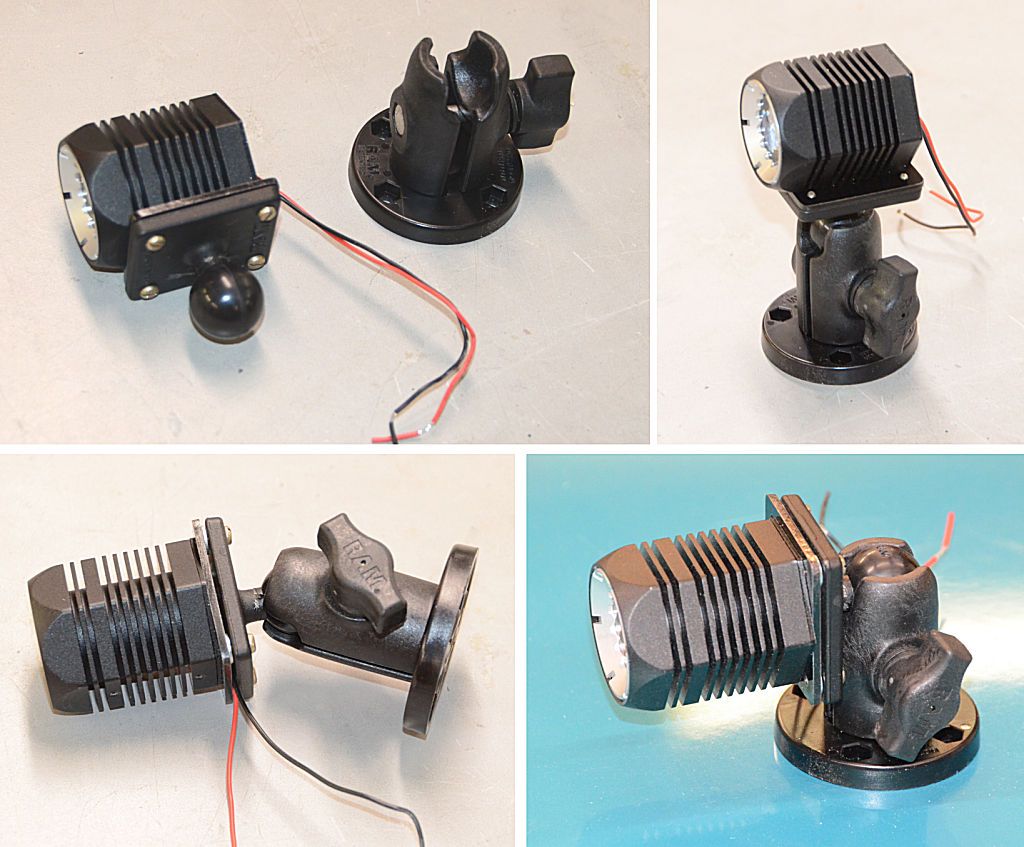
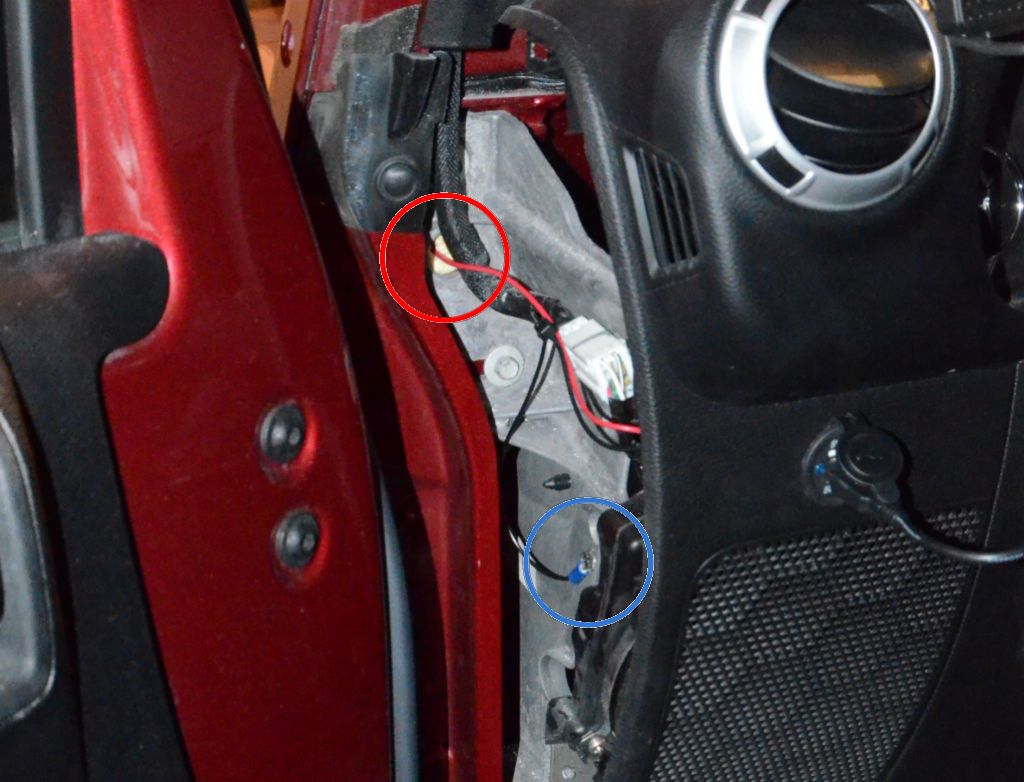
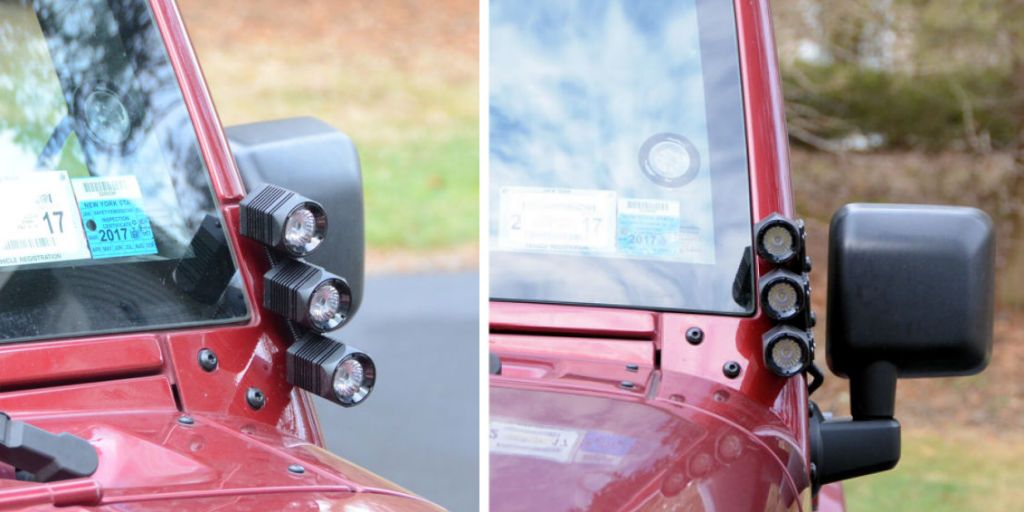
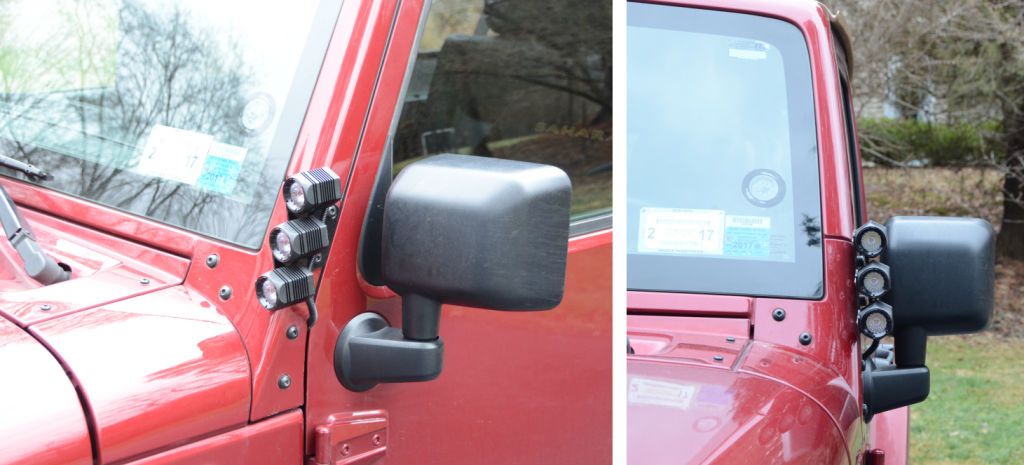
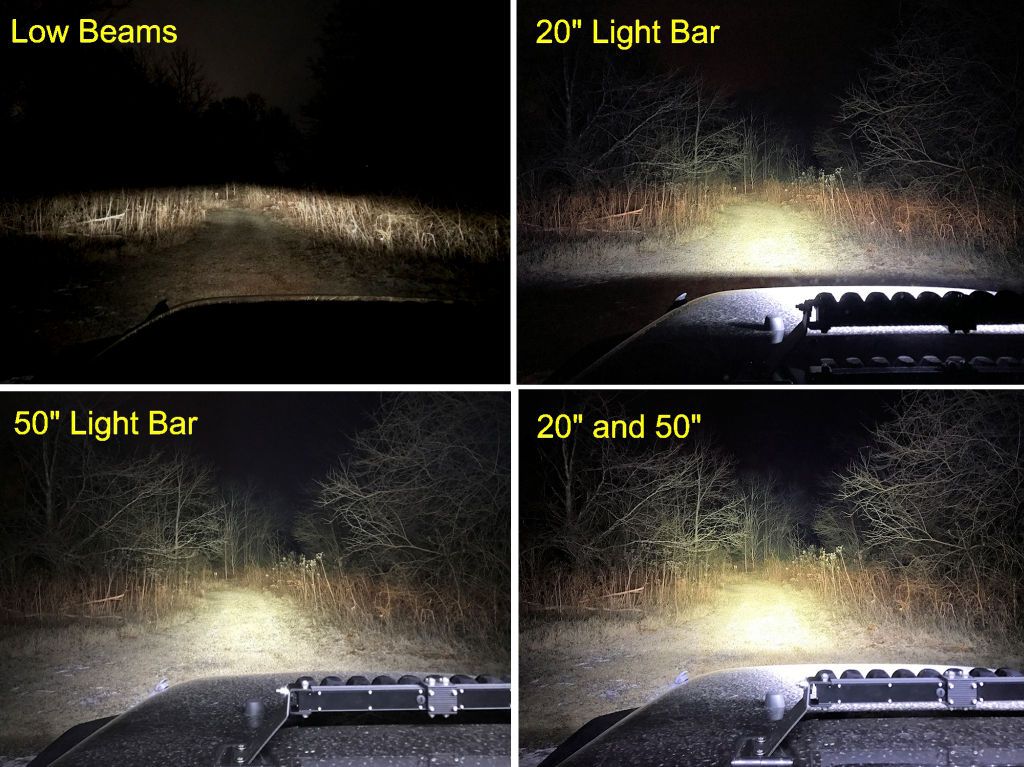
I've been posting only about the individual LED pods and the mounting ideas I've been working on (with Donny's help!). The manufacturer also makes preconfigured light bars, which come in 20" and 50" lengths. I'm not testing those, that's being done by the company that's working to bring these to the Jeep market. Today they sent me a few photos of their initial testing.

Both bars on one of their test Jeeps:

TwoBars_zps24hufex4.jpg


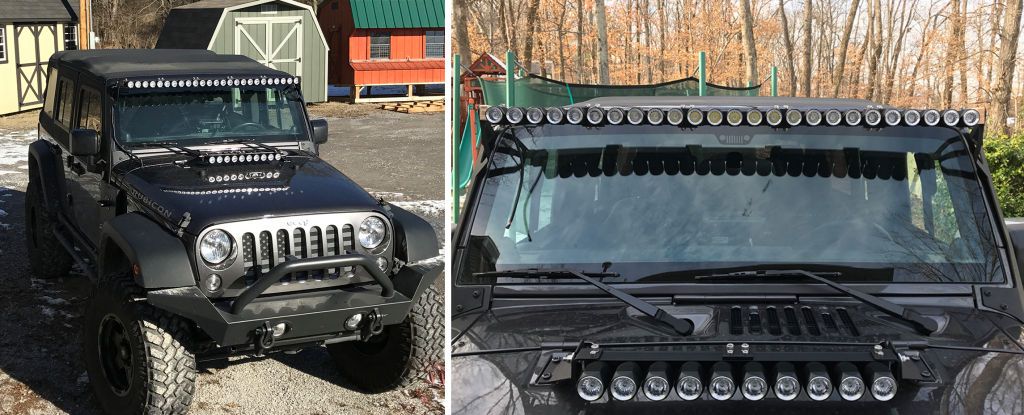
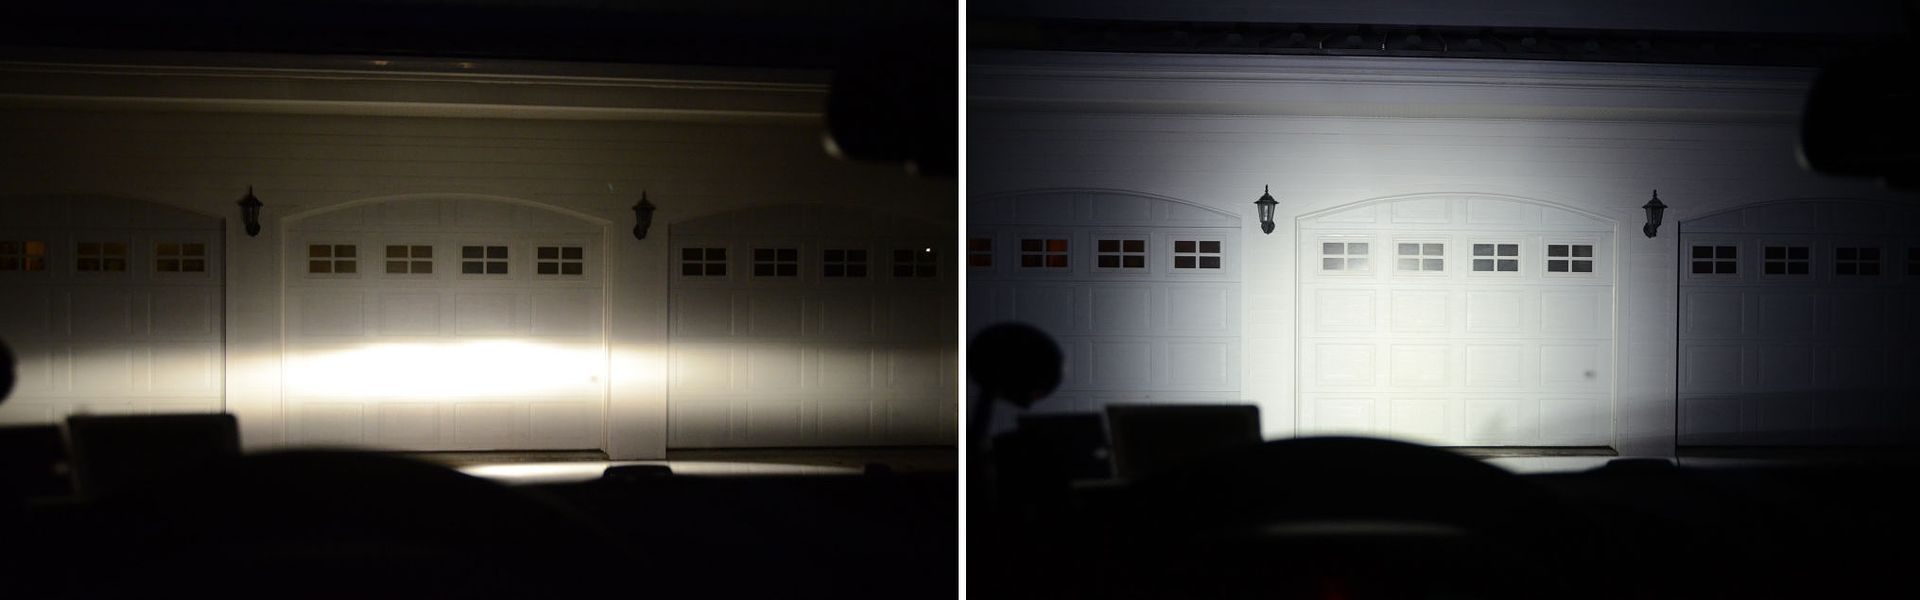
Some comparison photos. In each photo only the light(s) in the caption are turned on.

BarsComparison_zpsatlis5iz.jpg


Blinded by the light...
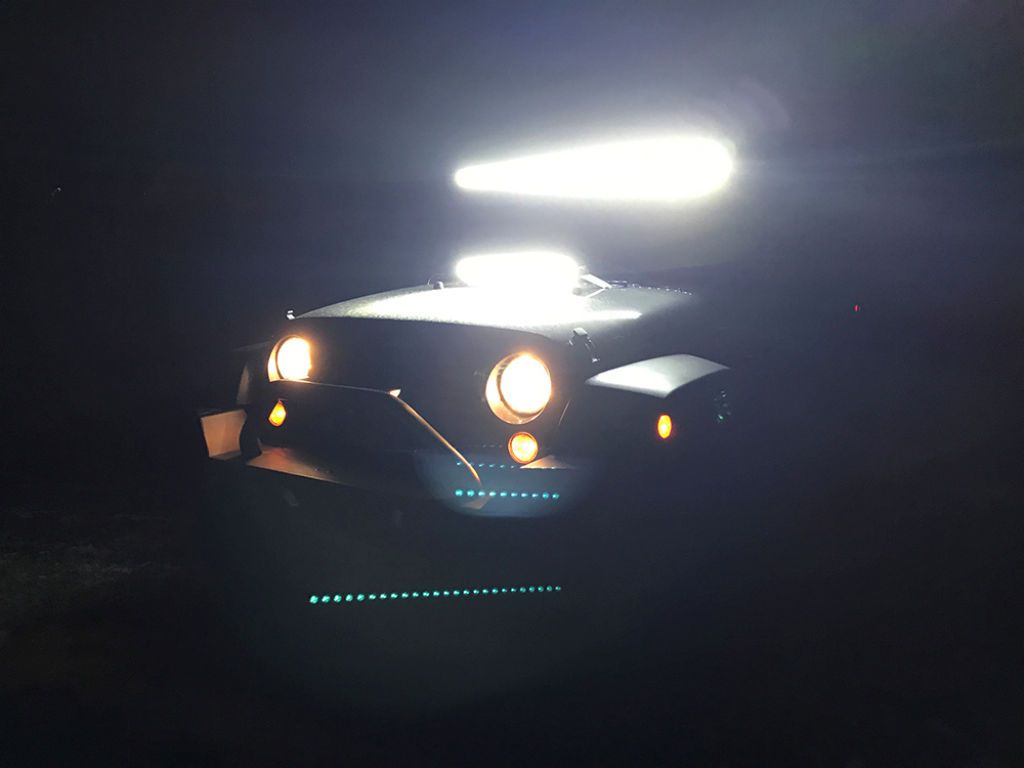
BarsLit_zpsf0nlcw86.jpg
 

jscherb

Expedition Leader
I came across a Coyote tan and brown flag the other day so I picked it up to try with the Coyote Tactical Spare cover.

CoyoteFlag_zpse2nbzfqc.jpg


Yesterday the company that's working on bringing the spare cover to market contacted me asking for my input on putting Velcro on the covers for patches; they're getting ready to start a first production run and are trying to decide what to do with Velcro for patches.

I told them I thought a 3" section of Velcro on each side plus either a 6" or 3" length of Velcro on the face. Most patches I've seen are 3" or so wide, so maybe instead of the 6" strip that I put on the face of this prototype a 3" strip would be better.

GreenProto4_zpsktv2h55q.jpg


There's a 6" strip of Velcro on the face of this black one with a 3"-wide flag. If it would be most common to put only one patch on the face, then maybe a 3" strip of Velcro would be better than a 6".

BlackTacticalOnLJ_zpsl5v05mcy.jpg


Any opinions on the Velcro for me to pass along to them?
 

Comanche Scott

Expedition Leader
Right On!
I am very much looking forward to buying these for both rigs. :)

I'll be removing the velcro on the front, after using it to align the 4"x6" Flag patch that will be sewn on. So either way they go works fine for me.
 

GadgetPhreak

Observer
I would use the space to add a Search and Rescue name patch for extra badging, so would prefer longer.


Sent from my iPhone using Tapatalk
 

jscherb

Expedition Leader
Last week I posted an idea for mounting the LED light pods using off-the-shelf 1" ball mounts (http://www.expeditionportal.com/for...for-JK-factory-hardtops?p=2225013#post2225013). Many of the mounts on the market adhere to the AMPs standard mounting pattern, so this morning I made an adapter plate to to adapt the LED pods to the AMPs standard. All I have at this point is the ball that's bolted to the light in the photos below, I haven't picked up a bottom half of the mount yet - there are lots to choose from and I haven't decided which to get for testing. The adapter is very simple - a piece of 1/8" aluminum with a few holes in it.

AMPsAdapter_zps55uxto6s.jpg
 

jscherb

Expedition Leader
I've never been too fond of silver bumper covers on the Sahara. I was talking to Donny the other day about them and he told me they were easy to remove, so the other day I removed them. It was pouring out and I couldn't take a good photo, so I doctored an older photo, here compared to the undoctored version. The editing isn't perfect, but if you squint a bit...

SaharaBumpers1_zpsjtwiwahh.jpg


I plan to leave the covers off and just have the black plastic bumpers for now, but I was wondering what it might look like if they were color matched, so I did these images. Again, they're not perfect edits, so squint a bit...

SaharaBumpers2_zpsceq5cybl.jpg


Not sure what I think of having them color matched, but anyway I'll just be leaving them off for now.

BTW I also removed that goofy plastic spoiler on the front of the hood after the original photo above was taken, as well as the "bull bar" and lights. I've removed a lot of stuff the P.O. installed, those are the latest removals. If you look back at the LED photos from a week or two ago you won't see the spoiler on the hood or the bar/lights.
 

jscherb

Expedition Leader
I spent the last few days making some changes to the LJ Safari Cab and I don't think I've ever photographed the two Safari Cabs together, so here's pair of Safari Cabs...

SafariPair1_zpskf0kcjdw.jpg


SafariPair2_zpsqx3yu7xa.jpg


SafariPair3_zpswu9ndf4h.jpg


SafariPair4_zpswuiync8y.jpg
 

jscherb

Expedition Leader
Back to the LED project... I built a prototype A-pillar mount for 3 LED pods.

JKAPillarLEDMount2_zpsrmnwv82p.jpg


JKAPillarLEDMount3_zpsjq1uwyrl.jpg


The mount is adjustable from level to about 10 degrees down angle. I didn't think it would need to adjust above level.

JKAPillarLEDMount5_zps8uvso9mp.jpg


A view with the door open:

JKAPillarLEDMount4_zpscjsvveoc.jpg


This same mount can be used on either side of the Jeep.

I'm going to add a second mounting position for the pods forward about one inch. By doing that, the pods can be mounted either on the outside of the mount as shown in these photos or on the inside of the mount.

Tonight I'll be powering these up to see how well they work, photos to come.

The same idea will work for the TJ/LJ, but the dimensions of the mount would be slightly different. I plan to make up a TJ version, but before doing the TJ version I'll probably to a prototype JK hood hinge mount to hold 1, 2 or 3 LED pods.
 

jscherb

Expedition Leader
As soon as it got fully dark, I did a quick test of the three LEDs mounted to the driver's side a-pillar. In this first photo I think you can see how much brighter than the headlights the 3 LEDs are.

APillarTest1a_zpsl9rttegn.jpg


On the left is the headlights only; on the right are the LEDs only. Photos taken from the driver's seat, in normal driving position. The Jeep is pointed at the middle of the center garage door.

APillarTest1b_zpsxhee0pfq.jpg
 

jscherb

Expedition Leader
I made up prototype hood hinge mounts for the LED pods today. The base mounts attach using the hinge screws and hold one LED. There are different base mounts for the JK and the TJ because the hinge bolt patterns are different. They're just on spare hoods in the workshop in these photos, haven't tested them on any Jeeps yet.

HingeMountSingles_zpsyf0amscy.jpg


For mounting either two or three LEDs to a hinge, there are optional multi-mounting brackets that bolt to the base mount. The multi-brackets mount to either the JK or TJ base mounts shown above. There's a double multi-mount and a triple multi-mount, in this photo there's a double on the JK hinge and a triple on the TJ hinge.

HingeMountMultis_zpsprppuabp.jpg


So far, mounting options I've experimented with for 1-3 LED pods include:

  • The bracket that comes with them from the factory, which can be secured under many of the 8mm bolts on the JK or TJ Wrangler as shown earlier in the thread.
  • The a-pillar mounts showed and tested over the past few days (only JK shown; but could do TJ version also).
  • These hood hinge mounts (JK and TJ) and optional multi-mount brackets for 1-3 LED pods.
  • The AMPs adapter that allows a light pod to be mounted using a standard 1" ball mount, also shown earlier in the thread.

Probably that's all the custom mounts I'll design for now, unless someone has something else they really think I should do. Unless some other ideas come up, I'll turn these designs over to the company and let them decide which are worth producing. Any input on that would be useful too.
 

jscherb

Expedition Leader
This comment came in about the LEDs:

could have quick- detach where light snaps off mount, can use on different mounting points , modular plug in harness for each mounting point..
For Camping, night trails, under hood , work light under neath
Having them easily removable means they can be stored in a secure location, safer from thieves, quickly and easily plugged in for different lighting tasks.

I think that's where the ball mount comes in, the ball makes it easy to remove the light. About a week ago I posted about a prototype adapter for the AMPs mounting standard and the other day I picked up a simple surface mount for the ball. A few examples of the light with the adapter and a ball mount:

BallMounts2_zpspipb6m9j.jpg


Here's one that could bolt almost anywhere and paired up with an arm like the one above it could be used in many places: RAM Motorcycle Base with 9mm Hole and 1" Ball Unpackaged - RAM-B-272U | RAM Mounts. There must be over a hundred different 1" ball options at the RAM site: Component search for all components - Page 1

This one is interesting, it's a simple ball with a track mount from YakAttack: https://www.yakattack.us/SB1_12_p/sb1-12.htm. Various tracks and other accessories are available: https://www.yakattack.us/by-product-name/geartrac/. I could imagine tracks attached to the sides and back of a roof rack or trailer rack for very flexible campground lighting.
 

jscherb

Expedition Leader
A quick and easy electrical project... I use a suction cell phone holder on the left side of my dash and wanted to be able to charge the phone in the holder without stringing a USB cable over to the power outlet in the center of the dash or the console, so I installed an outlet in the panel just above the speaker grille. It's connected to switched power so the outlet is only on when the Jeep is running.

USBOutlet_zpsie85fqxp.jpg


These outlets can be found on eBay for less than $5 if you're willing to wait for them to arrive from Asia, or less than $10 from U.S. sellers. Search on "marine USB outlet".

There's room for more than one outlet/device in that panel, I recently installed a similarly-styled volt meter in the center dash of my LJ and I'll probably add one to the JK as well.

Voltmeter3_zpsm2nj4per.jpg
 

MagicMtnDan

2020 JT Rubicon Launch Edition & 2021 F350 6.7L
A quick and easy electrical project... I use a suction cell phone holder on the left side of my dash and wanted to be able to charge the phone in the holder without stringing a USB cable over to the power outlet in the center of the dash or the console, so I installed an outlet in the panel just above the speaker grille. It's connected to switched power so the outlet is only on when the Jeep is running.

USBOutlet_zpsie85fqxp.jpg


Great idea. Where did you tap into switched power? (I'm always interested in where JK owner tap into due to CANBUS)
 

jscherb

Expedition Leader
Great idea. Where did you tap into switched power? (I'm always interested in where JK owner tap into due to CANBUS)

I first thought of picking off switched power under the dash somewhere but it was going to be awkward to route the wire nicely, so I went directly to the TIPM. Near where I installed the outlet there's an easy route to the engine compartment (circled in red), so I went that way, then across the back of the engine compartment and into the TIPM, where I used a fuse tap on fuse position M7. M7 can be set for switched or unswitched power, I've got the fuse and tap in the switched power side. I made the ground connection using a sheet metal screw in a hole I drilled in the frame under the dash (circled in blue).

USBOutletWiring_zpsoxi9qwry.jpg
 

jscherb

Expedition Leader
I've done an update to the a-pillar LED bracket that allows the lights to be placed outboard on the side of the a-pillar as before, or inboard in front of the a-pillar.

Inboard:

JKAPillarInside1_zpsxrsiq9l6.jpg


Outboard:

JKAPillarOutside1_zpsgowca0wv.jpg


Also today I did a TJ/LJ version of the above.
 

Forum statistics

Threads
187,460
Messages
2,894,788
Members
228,401
Latest member
rpinkall1
Top