Tire Carrier Hinges - again

Which tire carrier hinge would you choose?

  • AJ's Offroad Armor - double shear design

    Votes: 19 21.1%
  • Iron Pig's Beefy bronze bushing design

    Votes: 17 18.9%
  • Comp 4x4 Sleeve design

    Votes: 16 17.8%
  • 4x4Labs 1.75 spindle design

    Votes: 14 15.6%
  • Other (EMS, Rockstomper, etc)

    Votes: 24 26.7%

  • Total voters
    90

maXTERRA

Adventurer
Looks like you've done a really nice job building that bumper, but I'm wondering why you didn't put the pivot on the side that the tire's on.

Good question and I thought the same thing when I was first looking at a couple of designs and asking why they did it that way.

Simply, because you have to on the xterra with the bumper being narrower than the hatch, due to the plastic bumper corners.
If the bumper and pivot point were out near the actual corner of the body, it would have been much easier to build and add more accessories, such as a fuel can mount.

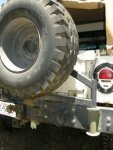
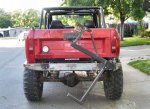
This pic isn't the best angle to show the clearance issue, but with the swingarm fully open, the hi-lift and tire just barely clears the hatch swing path as it opens.
DSC00091.jpg

Here's an old pic just after install (with stock tires still)
bumper02.jpg
 

ScoutII

Adventurer
I don't own a mill or lathe so no custom machined parts. (hopfully) there is a local place that will make parts for me. I also need to keep it simple for field repair if needed.

Thanks for the picture, looks like hammerite paint.

I ordered some tubing and other items on Friday and that should work for the hinge. The next issue I have is lifting the tire onto the carrier. My old tires were 150lbs:Wow1: Have not weight the new ones, but they have to be close to 165lbs if not more.
attachment.php


I've looked around and found a couple cool items, one is used on the H1 and the other is for a Jeep. I'm going to copy this design and build the swing arm on the carrier to lower and rasie the tire. Still looking for a cable hoist that will work, figure most junk yards will have truck tire cable hoist.

http://www.youtube.com/watch?v=xLFrE04S0iA&feature=player_embedded
 

Attachments

  • Switchblade1.jpg
    Switchblade1.jpg
    116.1 KB · Views: 307
Last edited:

ScoutII

Adventurer
Wow the parts arrived. I did not expect every to get here so fast.

I just ordered from MSC on Monday and it arrived on Tuesday:coffeedrink:

Here is a pic of the hinge parts. The DOM is a bit under sized by a few thousands. I would take to the machine shop, but that would have to wait until friday for that. So last night I used my brake hone and thats going slow. have about .003 to go. I also sanded and polished the bolt, so thats why it looks shinny.
 

Attachments

  • scout 051.jpg
    scout 051.jpg
    113.3 KB · Views: 232
  • scout 053.jpg
    scout 053.jpg
    79.8 KB · Views: 182

tremors834

Adventurer
Scout, Please.. more pics and info as you go along.
I'm in the processs of going the same route. I fabbed my own swing bumper also but the hinge was a poor design on my part. I am changing the hinge to something almost exactly as yours. I'm waiting for the DOM tubing and sleeves to be delivered tomorrow. Only difference is I'm going with two flanged sleeve bearings.
 

KLAKEBRONCO

Adventurer
I like the simple design of a regular swing out and no mechanism to lower the tire. Just add a piece of tube, cut in half to look like an upside down U, and weld that to to the tire mounting surface on the carrier. This way you can lift it up on there and that will take some of the weight off you so you can line up the lugs....

But I'll be watching the build for a raise/lower mechanism. It's a good idea. I just hope to not have to use it much.
 

ScoutII

Adventurer
The design shogun posted looks a lot like the HUMVEE ones I found.

Well it took long enough, but between the brake hone and using a drum sander. Hind sight 20/20 I would have just paid them to check the tube before shipping as they have a lathe in the shop and it would have taken them 5 minutes. I wanted the sleeve/bearing to be tight, but not a press fit as I need to remove the bearing for final welding. I have a press, but did not want to mess up the bronze sleeve.

A friend said they could not tell how big it was, so I added a quarter. The reason I did the sleeve and thrush bearing vs the flange. I could not find a flange that was 1/4" wide to match the tubing I have. I copying the basic design of the hinge that MAXterra posted.

I also found a bronze sleeve on amazon, shipped for $15 and it's 1" ID and 1.5" OD killer is a the six week shipping time. I order one for a friend as he wants to add one once we figure out the other details.
search on Bunting Bearing. I got the CB162432

Edit... I planned on the hinge being 3.5" but since it's currently 4" I put a 1/2 bar under it. I wanted the bolt head flush with the bottom of the bumper
 

Attachments

  • scout 056.jpg
    scout 056.jpg
    52.9 KB · Views: 300
  • scout 055.jpg
    scout 055.jpg
    67.4 KB · Views: 305
  • scout 062.jpg
    scout 062.jpg
    89 KB · Views: 406
  • scout 061.jpg
    scout 061.jpg
    94.7 KB · Views: 355
Last edited:

ScoutII

Adventurer
A buddy stop by the other day on the way to the dump and he had some 2x2x16 ga in the back, so I graped it to use for mock up. I went to the junk yard as it was 1/2 price day today and pulled a tire hoist from a chevy pickup. I'm sure any pickup would do, but the bed was off and it took about 5 minutes and I was out of there:victory:

I mocked it up to figure out the issue you allways hit when building vs planning. This is not the final design, just made from what was handy. But it works I need to beef up the bumper next, as all that weight you can see it flex.:Wow1:
 

Attachments

  • scout 069.jpg
    scout 069.jpg
    116.1 KB · Views: 206
  • scout 068.jpg
    scout 068.jpg
    176 KB · Views: 210
  • scout 067.jpg
    scout 067.jpg
    81.8 KB · Views: 215
  • scout 070.jpg
    scout 070.jpg
    184 KB · Views: 228
  • scout 072.jpg
    scout 072.jpg
    98.7 KB · Views: 402
  • scout 073.jpg
    scout 073.jpg
    68.5 KB · Views: 303
  • scout 074.jpg
    scout 074.jpg
    99.7 KB · Views: 404
  • scout 075.jpg
    scout 075.jpg
    102.5 KB · Views: 376

chet

island Explorer
thats pretty slick! good use of JY parts there! I am guessing a flange and pin to keep it in the up position?
 

ntsqd

Heretic Car Camper
A note of caution, for max life the end of the cable needs to be able to rotate. Looks like in the mock-up that it is fixed and that will fatigue the cable at the end fitting rather rapidly.
 

KLAKEBRONCO

Adventurer
A buddy stop by the other day on the way to the dump and he had some 2x2x16 ga in the back, so I graped it to use for mock up. I went to the junk yard as it was 1/2 price day today and pulled a tire hoist from a chevy pickup. I'm sure any pickup would do, but the bed was off and it took about 5 minutes and I was out of there:victory:

I mocked it up to figure out the issue you allways hit when building vs planning. This is not the final design, just made from what was handy. But it works I need to beef up the bumper next, as all that weight you can see it flex.:Wow1:


That is a good idea....I might have to copy that if ya don't mind. I've got my bumper almost done, and the hinge almost done so it'll be time to work on the tire carrier soon.


I was wondering why you angled the tire carrier assembly up? If you went strait across like normal it will be much easier to build a solid latching mechanism, and will let you lower the tire all the way to the ground.
 

ScoutII

Adventurer
A note of caution, for max life the end of the cable needs to be able to rotate. Looks like in the mock-up that it is fixed and that will fatigue the cable at the end fitting rather rapidly.


Good note: I plan on drilling a hole in the top of the mount, this will allow the crimp on metal tab to rotate if it wants too. I could even add some uhmw. it looks like I will need some in another location too.

I was wondering why you angled the tire carrier assembly up? If you went strait across like normal it will be much easier to build a solid latching mechanism, and will let you lower the tire all the way to the ground.


The cable is very long, like 3' so thats not an issue. Guess a pic would tell a 1,000 words. I tossed a few ideas around like going straight across, but I was coping Switchblade tire carrier I posted. As for the latch to the bumper, that will come next weekend. I really have not come up with an idea I like yet. I think if it was behind the tire so you can't see it would look cool.

here the link again to the video http://www.youtube.com/watch?v=xLFrE04S0iA&feature=player_embedded
 

Attachments

  • scout 078.jpg
    scout 078.jpg
    150.3 KB · Views: 246
Last edited:

ScoutII

Adventurer
Was able to work on the hoist this Sunday. No more mockup, building for real this time.
 

Attachments

  • Scout bumper build 25.jpg
    Scout bumper build 25.jpg
    119.5 KB · Views: 348
  • Scout bumper build 26.jpg
    Scout bumper build 26.jpg
    118.4 KB · Views: 364
  • Scout bumper build 27.jpg
    Scout bumper build 27.jpg
    115.4 KB · Views: 371

Forum statistics

Threads
187,467
Messages
2,894,850
Members
228,400
Latest member
rpinkall1
Top