You are using an out of date browser. It may not display this or other websites correctly.
You should upgrade or use an alternative browser.
You should upgrade or use an alternative browser.
Capture Colorado 01 TRD Taco - GOAE build
- Thread starter capturecolorado
- Start date
capturecolorado
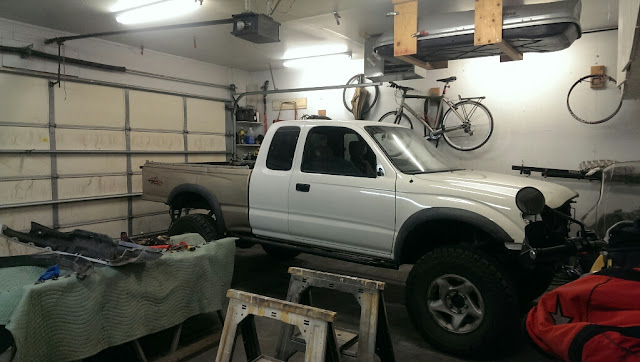
Hooray bikes!
Gotta bleed the brakes and clutch tomorrow - then test drive! Started looking into what it'll take to switch the power windows over to the new doors, looks real straightforward... I found a good writeup here, in case anyone else is wondering what's going on inside the doors.
Gonna start prepping for paint after it's drivable, I expect we'll spray tomorrow evening. I'm also thinking I'll tint the door windows while going through this whole ordeal - not sure how easy it is to slide the whole glass piece out, but hopefully it's not too bad... I'd like to yank the glass out and tint it without dealing with the rubber bits.
Anyway, that's the plan going into tomorrow, not sure what I'll do as far as clear coat goes, my fallback plan is simply just to get a quart of Rustoleum auto clear, we'll see. Pics will come tomorrow I'm sure.
capturecolorado
Hooray bikes!
Got a head start on designing the rear bumper... Probably going to get something mocked up on the M416 box tonight as well to kind of dial in dimensions.
Basically I wanted to come up with something that'd be lighter weight than the tube-based design I've got right now, and would work well with the way the M416 box will integrate onto the truck with a flatbed. This also reflects some of the details from the front bumper nicely for continuity front-to-back, as well as beefs up the hinge mount and located it almost directly on the bumper's mount itself, which will help stiffen things up a bit - this design could easily be adapted to full-width as well, however some of the angles on the side would change slightly to keep the back of the bumper a little tighter to the truck bed (if anyone were to, say, give me money...to build...one). As far as overall kind of shape - I took some inspiration from companies like Poison Spyder and JCR Offroad for their Wrangler front bumpers...


I didn't reflect this in the sketch, but this will likely utilize the same dual-sheer mount that I have currently, possibly just bolted straight to the side of the bumper, though, for a simpler setup.

And the latch, will be a straight-pull De-Sta-Co latch, rather than a 90* bend, just simpler that way. (didn't draw this out because that's too much work, you can use your imaginations)

I'll likely do something like what Poison Spyder offers for their JK swingout bumpers, which is a small tierod dingus to allow the tire carrier to pull the tailgate open (the new bed will have a side-hinged tailgate).
Thoughts?
*edit:
I don't really foresee wanting to use a hitch rack again in the future once I get bike racks up on top of the box, but given the possibility of that need arising, I have this idea that would basically be a light-duty towing/hauling bolt-on addition, not in the way all the time when it's not needed, but can easily be bolted to the bottom of the winch plate for occasional use.

Basically I wanted to come up with something that'd be lighter weight than the tube-based design I've got right now, and would work well with the way the M416 box will integrate onto the truck with a flatbed. This also reflects some of the details from the front bumper nicely for continuity front-to-back, as well as beefs up the hinge mount and located it almost directly on the bumper's mount itself, which will help stiffen things up a bit - this design could easily be adapted to full-width as well, however some of the angles on the side would change slightly to keep the back of the bumper a little tighter to the truck bed (if anyone were to, say, give me money...to build...one). As far as overall kind of shape - I took some inspiration from companies like Poison Spyder and JCR Offroad for their Wrangler front bumpers...
I didn't reflect this in the sketch, but this will likely utilize the same dual-sheer mount that I have currently, possibly just bolted straight to the side of the bumper, though, for a simpler setup.
And the latch, will be a straight-pull De-Sta-Co latch, rather than a 90* bend, just simpler that way. (didn't draw this out because that's too much work, you can use your imaginations)
I'll likely do something like what Poison Spyder offers for their JK swingout bumpers, which is a small tierod dingus to allow the tire carrier to pull the tailgate open (the new bed will have a side-hinged tailgate).
Thoughts?
*edit:
I don't really foresee wanting to use a hitch rack again in the future once I get bike racks up on top of the box, but given the possibility of that need arising, I have this idea that would basically be a light-duty towing/hauling bolt-on addition, not in the way all the time when it's not needed, but can easily be bolted to the bottom of the winch plate for occasional use.
Last edited:
climber-420
Adventurer
I bet you never thought your truck would turn into this. It's funny how a small accident can turn something into a better design.
capturecolorado
Hooray bikes!
I bet you never thought your truck would turn into this. It's funny how a small accident can turn something into a better design.
I knew that TacoAss MK III would be in my future when I found time to revamp the concept, I didn't think it'd be a winch-friendly bumper... nor did I expect it to be associated with a Tacochaser kind of project. Ever since I saw the Tacochaser, I knew I liked it, but the price of the replacement bed is so high, it got me thinking about flatbedding it, or something else, and the Tacochaser provides security and versatility all in one
")
______
Recap of the week... Not a whole lot went according to plan, problems kept popping up, all of which were annoying and/or expensive (like paint).
I took the opportunity of door apartism to tint the windows, got some 20% film from O'Reilly's, then had to go buy more, because I overcut the first piece. So now I have extra, I could up the tint on the rears a little more for more privacy back there, might just leave it.

Got everything up and running, took it for a test drive.

Got all the pieces sanded down and primed, here they are ready for paint.

Sprayed them down. The first paint we tried, I used the wrong reducer, killed a quart of auto paint. The second quart, I bought the correct reducer, went a lot smoother. However I should have had 2 quarts mixed to spray, 1 didn't quite cover. I'm ok with it, because the color is wrong, so I'll be going back through and repainting all the pieces when I can.

Tri-colored truck... not that sexy.
Got the bumpers on today, the driver's side door panel replaced, and took it for an alignment, and drove it home.
MaverickTRD
Adventurer
wow, great work and dedication!!!!
Random question, do you now have to go register the truck as a different rig? does the vin and registration go off the frame, or the typical vin plate on the firewall/dash area?
Random question, do you now have to go register the truck as a different rig? does the vin and registration go off the frame, or the typical vin plate on the firewall/dash area?
capturecolorado
Hooray bikes!
I think he swapped the VIN plates so he wouldn't have to worry about re-registering.
^^^
wow, great work and dedication!!!!
Random question, do you now have to go register the truck as a different rig? does the vin and registration go off the frame, or the typical vin plate on the firewall/dash area?
Shhh... No one's supposed to find out
Adventurous
Explorer
Nice dude! You got that done in pretty short order. What's the timeframe for the back end of the truck?
capturecolorado
Hooray bikes!
Nice dude! You got that done in pretty short order. What's the timeframe for the back end of the truck?
I hope to get started on TacoAss MK III sometime mid January. The rear bumper sold, so I'm probably going to wait for things to settle down and resume normalcy a bit before beginning a project like that.
capturecolorado
Hooray bikes!
Decided I'm finally tired enough of the stock housings to do something about it. About a week ago I went up to a bluegrass show deep in the mountains, and driving back on I70 into a lane of heavy ski traffic, I couldn't see a damn thing on a lot of sections of the highway. My setup was adequate for my commute home from the shop at night - Olympus Offroad LED conversion in stock housings make for a great low beam spread compared to traditional halogen bulbs, but the high beams were no brighter... just a little taller, and they didn't get quite as wide as I would like (ya know, deer). My commute home is a 2-lane back road up Golden Gate Canyon, I don't like using my LED bars on a lot of that, because there's often blind curves where I'm likely to blind the living daylights out of oncoming traffic. But on that road, the LED's and stock housings were OK, not a lot of other traffic to drown out the light from my truck, etc.
So I buckled down and hopped on the Retrofit Source group buy. Got the D2S kit with the 50w ballast and 6000k bulbs - which with the higher wattage ballast, should put out 5000k light color.
This is my project for today (along with cleaning, doing stuff with horses, making some pizza, so on).
Testing the high beam solenoid sounded like I was operating a telegraph.

Once you've got the lens off and the housing is cooled enough to handle (almost immediately), remove the reflecty dingus.

I found no mention of the solenoid leads in any instructions here on TW, so I figured I'd snap a picture - there's a hole by the notch that holds the spring/bulb holder dingus in place, thread the wires through there and you'll never see the wires again.

Note the hole. Once you're here, just put the H4 adapter plate/spacer/washer thing in place, and then tighten the lock nut down. I found that doing this with the housing still warm helped to soften up the silicone washer, and pushing the projector unit into the housing and tightening the nut as much as possible helped to remove all possible play. The threads on the projector aren't really all that finely machined, so expect a bit of a challenge to get this secured. It kind of sucked, but it's fine.

I'm personally not a big fan of the way most of the shrouds look that are available, I chose the Iris shroud, it's simple and clean, no fuss.

I was thinking I might go back in later down the line and pull the lenses back off, and wire in a loop of amber LED strip, similar to what I used in my bed for lighting, as turn signal lights. I wasn't sure if I wanted to do that just yet so I held off for now; my thoughts are that the amber might reflect off the back of the housing and make it look kind of cool when blinking.... that might not be the case, but either way, I need a better turn signal on the front, and that's cheap.
I'm not sure yet where to go to aim these things, there's not a single bit of flat ground up here on the property, might be able to find something in town, but I'll be sure to get output shots soon.
In the meantime, here's the first actual photographs I've taken this year. It's been wacky weather up here, and yesterday I woke up to bluebird skies above me, and dark dreary clouds to the west; with everything covered in a pretty layer of frosty snow.


So I buckled down and hopped on the Retrofit Source group buy. Got the D2S kit with the 50w ballast and 6000k bulbs - which with the higher wattage ballast, should put out 5000k light color.
This is my project for today (along with cleaning, doing stuff with horses, making some pizza, so on).
Testing the high beam solenoid sounded like I was operating a telegraph.
Once you've got the lens off and the housing is cooled enough to handle (almost immediately), remove the reflecty dingus.
I found no mention of the solenoid leads in any instructions here on TW, so I figured I'd snap a picture - there's a hole by the notch that holds the spring/bulb holder dingus in place, thread the wires through there and you'll never see the wires again.
Note the hole. Once you're here, just put the H4 adapter plate/spacer/washer thing in place, and then tighten the lock nut down. I found that doing this with the housing still warm helped to soften up the silicone washer, and pushing the projector unit into the housing and tightening the nut as much as possible helped to remove all possible play. The threads on the projector aren't really all that finely machined, so expect a bit of a challenge to get this secured. It kind of sucked, but it's fine.
I'm personally not a big fan of the way most of the shrouds look that are available, I chose the Iris shroud, it's simple and clean, no fuss.
I was thinking I might go back in later down the line and pull the lenses back off, and wire in a loop of amber LED strip, similar to what I used in my bed for lighting, as turn signal lights. I wasn't sure if I wanted to do that just yet so I held off for now; my thoughts are that the amber might reflect off the back of the housing and make it look kind of cool when blinking.... that might not be the case, but either way, I need a better turn signal on the front, and that's cheap.
I'm not sure yet where to go to aim these things, there's not a single bit of flat ground up here on the property, might be able to find something in town, but I'll be sure to get output shots soon.
In the meantime, here's the first actual photographs I've taken this year. It's been wacky weather up here, and yesterday I woke up to bluebird skies above me, and dark dreary clouds to the west; with everything covered in a pretty layer of frosty snow.
capturecolorado
Hooray bikes!
Check it out... came up with an idea for the lid of the bed this morning. I designed it to have some angles to add interest, and generally make it not ugly and flat, but as such, I'm kind of sacrificing potential storage space - no more, check out the rendering for what I'm blabbing about. There's secret...bigger...broader plans for how to use this space beyond just storage, if you're picking up what I'm putting down.

Pricing out material today, I've concluded on a mounting method - sticking with the 4 standard bed mount locations - I found some softer durometer body mount bushings that I'll be using that should be fine. Need to get around to ordering some of the essentials here soon so I can begin working on the flatbed frame and all that, hopefully the bumper will come together once the flatbed is framed out and I have all the dimensions sorted out.
:elkgrin:
Forum statistics
Members online
- jmattaustin
- Pflynn1
- jayoutside
- IdaSHO
- mtnbike28
- jameswirl
- gator70
- mmmaaatttttt
- NOPEC
- JCAnthony
- dizzydom
- claymond
- calemaddox
- Verkstad
- mxpatriot
- High Shelter
- Grgrgr
- 2006pct
- Christian P.
- Monadnock
- mmoran
- Beewinge
- shellb
- cliffi
- ZONE ZERO
- Littlefish
- b_doornenbal
- borovans
- scoolbubba
- chrispxj
- mrbenson
- 1979ford
- Baloo
- Lynx
- spot
- tacollie
- Ratster
- glen2480
Total: 695 (members: 43, guests: 652)