MPV Build: 2000 7.3 PSD E350 w/ UJOR

djbonsu

Adventurer
Man, coming along nice !!! My broken hand just bot healed ! haha Should b starting my Stage 1 process SOON !!! I'm sure i'll b hitting u up w/ some questions if u don't mind ?? Keep us posted on build. I'm walking in ur foot steps.... LOL

Thank man! It's been hard finding time to get it to this level but focus and patience is key for me. Though I'm no pro, I'll definitely be around for questions you may have. All the best with your build...ill look for the thread if you decide to start one!
 

devo 1

Adventurer
A couple of things that helped me. I used 1/4 inch, 3/8 head self drilling screws for the starter holes in the frame. The other thing is I put a piece of plywood between the frame and radiator.
IMG_20150210_071726252_zpsdaicg3dt.jpg

IMG_20150127_174711559_zpshdoohvm9.jpg
 

edeuce

New member
Devo 1, that second pic of yours is what broke my hand !!! 1/2'' drill caught and i heard ''SNAP"!!! I was only drilling 1/2'' holes for my bumper !! HaHa Prob would have been good idea to have handle on drill...... LOL
 

SHAFT

Observer
I did basically the same as Devo but i used a sheet of metal in between the radiator and the frame instead of wood. Judging by the size of some of the divots i put in the scrap piece, i would've gone through the wood in about .3 of a second. :)
 

devo 1

Adventurer
I did basically the same as Devo but i used a sheet of metal in between the radiator and the frame instead of wood. Judging by the size of some of the divots i put in the scrap piece, i would've gone through the wood in about .3 of a second. :)

We need a like button. Way better idea.
Chris's video on the upper shock mounts helps a lot.
 

djbonsu

Adventurer
Phase 1 of the Build: UJOR Lift and Front Axle Instal

Had an EXHAUSTING weekend as I also had to work Saturday night in addition to the 20 or so hours we put into phase 1 of the build! The fatigue was well worth it though as Saturday nights event was AMAZING and full of energy and the van is sitting pretty tall right now!

A good friend of mine who has completed a couple 4x4 Jeep and car builds offered his family's shop space and help for the build. Their shop has a lift and that was a waaaayy better option than my driveway lol. I gladly accepted and headed out to their place first thing Saturday morning with all the build parts in the van. Soon as I got their, I drove into the shop, we unloaded the van and got the van on the lift for teardown! To my surprise, my friends dad also joined us to lend a hand as he also wanted to witness the transformation. Their shop was CLEAN, heated and well organized which helped with the focus and speed of the build.

I partially cleaned and painted the frame then instaled the hangers. I also doused the pitman arm with LOTS of PB Blaster in fear of the arm being stuck on their as I do have 271k on the clock.

IMG_9743.JPG IMG_9744.jpg

We started to remove all of the IFS suspension parts

IMG_9754.JPG

The drivers side shock put up a good fight but we settled that match with a torch

IMG_9755.JPG

IMG_9757.jpg

Old suspension out!

IMG_9762.jpg IMG_9759.jpg

With the old suspension out, we drew a cut line with paint marker on the engine cross member and pulled out the plasma.

IMG_9769.jpg

IMG_9773.jpg

IMG_9776.jpg

Cont'd....
 
Last edited:

edeuce

New member
NICE !!!! keep those pics coming...... i'm bk wkn just finished bumper. Think i'm wkn lil backwards...??? HahaIMG_2663.jpg
 

djbonsu

Adventurer
With the front engine cross member cut, primed and painted, we moved out to the rear suspension and proceeded to remove the OEM leafs and shocks in the rear and install the UJOR rear springs and shocks. We wrestled with the drivers side rear shock as it too was rusty up top and had no intentions of coming out BUT the biggest fight was with the rear shackles. The bolt was seized in the bushing and had to be cut and pressed out. I started to just order some new ones but with some quick thinking and a press in the shop, we avoided that scenario. Some new shackle bolts and u-bolts later, then rear suspension was done.

I wanted to make sure this beast could fit in my garage (94 inch door) so I opted for 4in rear springs instead of the 6" springs.

IMG_9778.jpg

IMG_9802.jpg

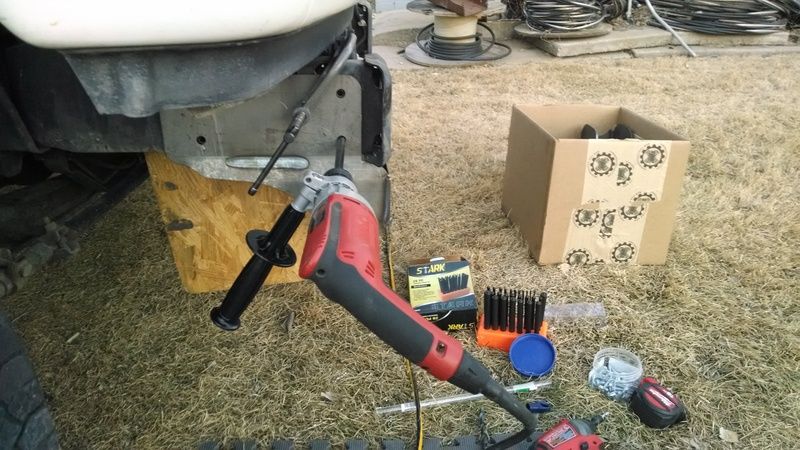
Next up was getting the front shackles sleeves installed. Pretty straight forward install using the supplied UJOR jig to cut the frame using the plasma.
On the 7.3 vans, the fuel pump is right in the area where the shackles are installed on the drivers side so we had to be careful while cutting the frame. We used some shielding to achieve this and removed a few bolts on the fuel pump mount to get it out of the way.

Drivers side


IMG_9792.jpg

IMG_9796.jpg

IMG_9794.jpg


Passengers side

IMG_9791.jpg

After welding them in, they were primed, painted and the springs were hung!

IMG_9799.jpg IMG_9798.jpg

Dana 60 IN!

image1fxle.jpg

This was a great stopping point...about 13 hours in and that pretty much concluded Saturdays work...At this point, I was pretty impressed with how much had accomplished considering we took a break for lunch and dinner. Food and water were definitely needed to stay focused and energetic...cont'd
 

djbonsu

Adventurer
Sunday morning was a bit sluggish for me as I worked an event Saturday night into Sunday morning. BUT the show must go on....

I arrived Sunday morning about 9am and we jumped back in it!

Mounted one end of the shocks and prepped the area to weld the shocks mounts.

IMG_9805.jpg IMG_9803.jpg

My buddy burning the shock mounts in..

IMG_9807.jpg

IMG_9814.jpg

Mounts primed, painted and then we installed the UJOR brake lines while the paint dried. Those brake line clips were a bit of a pain to get aligned blindly. Then installed the shocks once the brake lines were in.

IMG_9822.jpg

ABS lines soldered and mounted

IMG_9836.jpg

We then drained and filled the front and rear differential and mounted the wheels and tires!

IMG_9825.jpg

IMG_9829.jpg

Then we put her on the ground!......I knew the lift and tires would raise her up a bit but boy was she taller than I expected!

IMG_5888.jpg
 

djbonsu

Adventurer
Once on the ground we mounted up the rest of the front suspension components and torqued down ALL loose bolts. Took her for a spin and snapped a few pics! A BIG THANKS to my friend and his family for letting me utilize their shop! SHoutout to Chris at UJOR for be available via text for the few questions I had and for an awesome kit! And thanks to this forum and the members that have documented their builds and shared ideas before me....All of your builds have helped me get to this point! Still ALOT of work to do here and there but this is how she sits...

IMG_5889.jpg

IMG_5890.jpg

IMG_5891.jpg

IMG_5892.jpg
 
Last edited:

edeuce

New member
Man thats looks so awesome !!! Congrats on stage 1. Hey, what all parts did use for ur stage 1 build from ujoint kit ?
 

Forum statistics

Threads
187,453
Messages
2,894,714
Members
228,402
Latest member
rpinkall1
Top