Overland XJ Build. Not my first Rodeo.....(video included)

Overland History

Wanderluster
Pulling the timing chain cover off is fairly straightforward, with the exception of one bolt which I absolutely could not get to clear the clutch fan pulley mount. :rolleyes:

image.jpg


I ended up having to break the A/C Compressor bracket loose from the block (2 bolts on top between the compressor and block, one on the bottom fairly hidden) to wiggle it out of the timing chain cover.

A/C Compressor is to the left of the pic, these are the two bolts on top of the bracket...

image.jpg


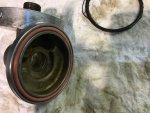
Out comes the last cover bolt....:rolleyes:

image.jpg


What I found underneath the cover was a little shocking at first, but considering the XJ has 200K miles, it wasn't too surprising!

I had been hearing a bit of noise from the front of the motor, but I couldn't decide if it was coming from the top or bottom end. Needless to say, the timing chain REALLY needed to be replaced! If anybody out there is reading this and has over 150K or so on your engine, I'd highly recommend doing the timing chain. While the 4.0L is a non-interference motor, it's still enough to strand you if the chain breaks or skips a tooth!

I uploaded a video of the slack in the chain to YouTube....

http://youtu.be/O4DmofkUW4Q


Pics of the slack....

image.jpg

image.jpg
 

Overland History

Wanderluster
Anyways, the front crank seal can prove to be bitchy to remove, especially with 200k miles on it.

image.jpg


It will only want to come off in pieces, which is a problem considering its got a metal ring under all of the rubber....

image.jpg


I decided the best thing to do would be the cut a slit into the outer lip of the seal, being VERY careful not the gouge the aluminum cover.

image.jpg


I then took a small file and slowly and carefully filed through the outer ring part of the seal, again, being careful not the hit the aluminum cover to avoid causing future oil leaks...

image.jpg


Once I filed through just enough of the ring to release the tension, out it popped with a flathead screwdriver....

image.jpg


I thoroughly cleaned out the seal housing to make way for the new one....

image.jpg


I added just a tiny bit of oil to the outer edge of the seal to allow it to slide into the housing just a little bit easier. I pressed it in evenly as far as I could by hand and found a socket that was large enough to cover the outer area of the seal and lightly tapped it in....

image.jpg

image.jpg


The parts cleaning tank in the shop does an excellent job of cleaning out built-up old oil and grime! :D

image.jpg
 
Last edited:

Overland History

Wanderluster
The timing chain kit that I bought came with a new guide, which I installed in the cover once it was cleaned...

image.jpg

image.jpg


One ***VERY*** important step that needs to be done when replacing the timing chain, is you MUST line up the timing hash marks on both gears. This will ensure that when you remove the gears to replace the chain, your engine timing will remain the same!

As you can see, I put the crank pulley bolt back into it's place and turned the motor over using a wrench until the hash marks line up perfectly.

image.jpg


To remove the Camshaft gear, it's best to leave the Crankshaft pulley bolt in place, and use a wrench to remove it while putting torque on the Crankshaft pulley bolt in the opposite direction.....

image.jpg


***Important*** Once you've gotten the Camshaft gear bolt removed(that's the one in the upper left of the pics), you can use your impact to remove the Crankshaft pulley bolt a second time *HOWEVER*, make SURE that your hash marks on BOTH pulleys still line up once both bolts are removed!!

Both gears may need some very slight coaxing with a pry bar, but should pop off very easily! They both slide off together while minding the timing chain. Both Gears have a key in them, so they only go back on one way!

image.jpg


Once removed, they got a bath in the parts cleaner to remove the old oil and grime....

image.jpg

image.jpg


After.....

image.jpg
 

Overland History

Wanderluster
Thanks Greg!


Next up was to clean the mating surface on the engine to make sure the timing cover gasket seals correctly.

Clean mating surface on the block...

image.jpg

image.jpg


New Timing Chain installed. It may take a few tries to get the gears lined up on the chain just right, but notice that the aforementioned hash marks on both gears line up perfectly with the new chain on! It's much easier to see in the second pic...

image.jpg

image.jpg


Also, I'm not sure if all of the years of XJ's have this, but my cam gear has a steel dowel with a spring inserted within the cam gear bolt. I took it out, cleaned it and reinstalled it with a little oil to keep it lubed until the motor is re-primed with the new oil pump.

image.jpg


Clearly the reason for it is that if it ever loosens up, the timing cover will keep it from backing completely out and will instead ride on the dowel against the cover. To be sure this doesn't ever happen I made sure I torqued it correctly! :D

image.jpg
 

Overland History

Wanderluster
Shiny clean cover installed. :D

I used the seal that was provided in the kit, and also spread a light coating of RTV on the block surface and timing chain cover surface, sandwiching the provided gasket in between. Once the RTV was spread on both surfaces, I had to work fairly quickly to get it all bolted up so the RTV was still fairly soft. I didn't get any pics of the process, but y'all get the idea....

image.jpg


The next seal(s) to tackle were in the oil filter neck. Mine took a T60 Torx socket to remove, though it's different on other XJ's.

image.jpg


I broke it loose with a ratchet originally, but the lack of room between the socket and frame, pinned the ratchet, so I used channel lock plyers to back it the rest of the way out....

image.jpg


Judging by the o-ring and how flattened it is, it's likely original and was definitely leaking!

image.jpg

image.jpg


The old o-ring was toast....

image.jpg


This is the "universal" o-ring package that the local parts house sells. It had exactly what I needed, and also everything I didn't. :D

image.jpg
 

Attachments

  • image.jpg
    image.jpg
    535.3 KB · Views: 53
Last edited:

F40

Adventurer
Which fuel pump did you go with? Mines been noisy for a few years now and should likely be replaced.
 

Overland History

Wanderluster
After a trip to the parts cleaner, on goes the new O-ring....

image.jpg


As you can see, the bolt that holds the oil filter neck to the block has a large and small O-ring, both of which are included in the universal kit...

image.jpg


Old on the left, new on the right. An important rule of thumb for installing o-rings is do not "roll" them into place, because it can twist and distort them once they're seated, possibly causing them to fail. Rather, use a tool such as a pick rotate them in a circular motion around their seat, as to allow the o-ring seam to face outward as the end result. Hope that makes sense...

image.jpg


Also cleaned around and on the mating surface after which I reinstalled the assembly....

image.jpg


After that was done, it was time to drop the oil pan to replace the oil pan seal, oil pump and rear main seal....

Dropped....

image.jpg


I originally thought that the rear main seal was the culprit of my rear engine oil leak, but apparently the oil pan gasket had a nice clean break in it.....

image.jpg


Honestly there wasn't much sludge in the oil pan, I was kinda surprised! I think the pan had likely been dropped and cleaned before.

image.jpg


Nice and shiny after a parts cleaner bath :D

image.jpg
 

Overland History

Wanderluster
With the bottom end of the motor exposed, I decided to replace the rear main seal first. It's located above the rear-most crankshaft cap, just in front of the Transmission bell-housing.

image.jpg


Popped both bolts out and removed the bottom half of the rear main seal....

image.jpg


I picked the old seal and grime out of the seating to make ready for the new seal....

image.jpg


In goes the new seal. I used a very slight coating of RTV on the bottom side of the seal that fits down inside the housing(which you can't see) to help ensure that it won't leak.

image.jpg


Next up is to replace the top half of the rear main seal. I've only got one picture because I was in a bit of a hurry to get it done in order to get somewhere on time. Regardless, it's fairly easy, just don't force it. It's a half moon shape, similar to the bottom half of the rear main. Use a small punch to tap it out on either side of the crankshaft. Once you've got it out slightly on one side, use some needle nose plyers to pull it the rest of the way out while but DO NOT scratch or scrape the crankshaft!

The best way that I've found to reinstall the new seal, is to use a small syringe to inject a little bit of liquid soap(it will burn off quickly from the heat of the engine) up into the seal housing to lube the way for the new seal.

Here is a pic of the new seal going in. I pushed most of it in by hand and lightly tapped the rest of it in with a punch. If you're not careful, it will bend outward, so a third hand to hold it flush against the crankshaft while tapping it in is what I recommend.

image.jpg


Once the top half of the rear main seal is in place and flush with the each side of the block, I recommend using a little bit of RTV on the top side of the bottom half of the rear main seal to help ensure no leaks....

image.jpg


Once I bolted that back up, I torqued the bolts to 80ft/lbs. I figured while I had the bottom half of the engine open, I might as well confirm the torque on the rest of the crankshaft caps, as well as the connecting rods.

The Crankshaft Cap Bolts I confirmed the torque to 80ft/lbs.

The Connecting Rod Cap Bolts I confirmed the torque to 33ft/lbs.

image.jpg
 

Overland History

Wanderluster
In the last pic of the bottom half of the engine, you can see the old oil pump. Well, I pulled that off for replacement...

Old pump...

image.jpg


I didn't get any pics of the new assembly in the two pieces how it came in the box, but I put the new pump in a vice, heated up the housing hole for the pickup tube with a torch, and tapped it into place. I put a little bit of oil on the pickup tube area that inserts into the pump block to allow it to slide in easier. It's essential to make sure that that pickup tube bolt tab aligns properly with the pump housing when tapping it into place. I used an open end wrench and a hammer to tap the pickup tube into the housing. The pics should explain a little better.....

image.jpg

image.jpg


Old pump and new 20% higher volume pump....

image.jpg


New oil pump installed.....

image.jpg


That's all for now. I should have the engine buttoned up and new radiator installed by the end of this weekend! :D
 

lostinbsd

New member
Man this makes me miss my old jeep, It always managed to keep me entertained.

IMG_20120602_175010.jpg


download_20160210_101437_zpscoijj3bi.jpg
 

Forum statistics

Threads
187,467
Messages
2,894,844
Members
228,400
Latest member
rpinkall1
Top