You are using an out of date browser. It may not display this or other websites correctly.
You should upgrade or use an alternative browser.
You should upgrade or use an alternative browser.
Craig's 1989 RRC
- Thread starter craig
- Start date
craig
Supporting Sponsor, Overland Certified OC0018
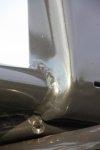
Very nice, I love the color and what youve done with the truck. Could you post a photo of where you removed the trim along the lower portion of the body.
Thanks. I haven't taken any photos of the trim removal yet. I still need to spend a few hours and remove the adhesive. I'll post one when it's completed for sure though.
I'm imagining that you'd like to know whether or not there are trim holes or if the paint matches (That's what I wondered before pulling it). The trim is secured with a very strong adhesive (no holes) and the paint should rub out to match well.
Craig
rover4x4
Adventurer
I might ditch mine, then I was worried there would be some holes left, however my paint is so bad I am sure I will still have a line going down the side of the truck. How do you like the ARB rack? Would you post more photos? Is it equipped to accommodate lights front and rear?
craig
Supporting Sponsor, Overland Certified OC0018
I might ditch mine, then I was worried there would be some holes left, however my paint is so bad I am sure I will still have a line going down the side of the truck. How do you like the ARB rack? Would you post more photos? Is it equipped to accommodate lights front and rear?
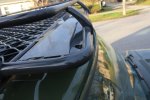
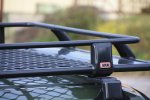
The ARB rack is great. Like everything from ARB it's impeccably manufactured. It's strong, lightweight, and has a great mounting system that distributes the weight across the entire gutter. It's adjustable for width and height so the feet follow the curvature of the RRC gutter. The powder coating is beautiful and durable. It has 4 holes up front for driving lights. It doesn't come with any mounting points for a work lamp, hi-lift, etc so I'm having to be a bit creative there. I have a few bracket/mounting ideas from Ho Chung at Expedition Exchange, some of the guys in the NW Overland Society, and my own creative genius (hah!). I refuse to drill the rack, but think I've identified a few ways to attach the various items I'd like to carry. I'll post pics once I've had a chance to experiment around with them a bit.
Sure, I'll grab a couple more pictures of the rack during lunch today.
Last edited:

craig
Supporting Sponsor, Overland Certified OC0018
I might ditch mine, then I was worried there would be some holes left, however my paint is so bad I am sure I will still have a line going down the side of the truck. How do you like the ARB rack? Would you post more photos? Is it equipped to accommodate lights front and rear?
More photos of the roof rack.
Attachments


craig
Supporting Sponsor, Overland Certified OC0018

craig
Supporting Sponsor, Overland Certified OC0018
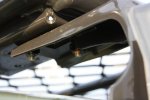
Winch and recovery point
My friend Grant helped me build a winch tray into my non-winch ARB front bumper and install a front recovery point. Still need to re-install the driving lights and front skid plate.
Continuing on with the budget build theme... The winch is the Ramsey RE12000 out of my previous Discovery II (free), the Masterpull Superline XD rope was won in a NW Overland Society fundraiser auction (cheap), and a friend picked up the Dixon Bate tow jaw for me when he was in the UK.
The grille was trimmed so the winch could sit back closer to the oil cooler, then repainted since it was faded and oxidized. The oil cooler was relocated up a couple of inches and the hard line was replaced with a soft line to clear the spur gear. The red thingy in the picture is a line lock which insures that at least 4 wraps are left on the drum. I'm very happy that there was enough room in the bumper to fit the winch and still have easy access to the clutch and remote control outlet.
The recovery point is a 3.5 ton Dixon Bate Tow Jaw
The winch was wired direct to the battery with a quick disconnect located behind the bumper. The quick disconnect makes it possible to remove the front bumper without having to disconnect the winch power leads from the winch or battery. It may also serve as a safe and easy way to connect up a pair of jumper cables.
Last edited:
craig
Supporting Sponsor, Overland Certified OC0018
Thanks! I love how it's turning out so far, but it really needs a new motor to be reliable over the long haul. The 3.9 is tired and needs new head gaskets. I'm pondering whether I go in and fix the head gaskets now, or save the money I'd spend and put it towards a TDI. I'm leaning towards the latter.
11b4v
Adventurer
RRC
Great build. Thats a great looking truck. Ive been dying to get my hands on an RRC and do a similiar build.
Going slow and easy, you can use a utility razor blade and come in real close to the body (low angle) to get that adhesive off without damaging the paint.
tagged for later.
Great build. Thats a great looking truck. Ive been dying to get my hands on an RRC and do a similiar build.
Going slow and easy, you can use a utility razor blade and come in real close to the body (low angle) to get that adhesive off without damaging the paint.
tagged for later.
Forum statistics
Members online
- HN2
- Oyster9
- ITTOG
- fatmab
- MJ Cho
- stinkpanther
- Billman369
- Catalanbull
- Craig_C
- BajaSurfRig
- Kkb83
- Ramairgto72
- Fifo
- Lynx
- Savagenut
- Farfrumwork
- Imnosaint
- huntsonora
- LivinAnAdvntr
- CowTownJohnny
- PNWexplorer3264
- tacollie
- lbarcher
- donots06
- chopyourown
- 85_Ranger4x4
- Pacific Northwest yetti
- SDDiver5
- roaminglost
- OTG_1
- Probably.stuck
- Pink2
- Winterpeg
- BDRXO
- FrontWaffle
- catawbajeepguy
- COSCAG00
- ekibike
- Rube2K6
- charleypartanna
- rsmccull
- HappyWifeHappyLife
- webfoots
- mripper
- lawless1
- Smksignals
- The Impossipede
- gkieser92
- YukonMontanaTannerTrapper
- BretEdge
Total: 837 (members: 61, guests: 776)