You are using an out of date browser. It may not display this or other websites correctly.
You should upgrade or use an alternative browser.
You should upgrade or use an alternative browser.
Craig's 1989 RRC
- Thread starter craig
- Start date

craig
Supporting Sponsor, Overland Certified OC0018
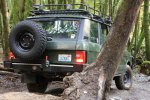
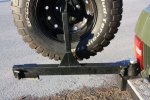
Rear tire carrier swingout is finished.
A huge thanks to Mike Oldani who did almost all the fabrication work even though he was super busy with his final quarter of college. Also thanks to Grant Mossman for helping with the final installation, and Dan Cronin for machining a couple of parts.
In the end I decided to leave off the jerry can holder and go with a 2/3s width arm. The shorter arm will make it easier to open/close when I'm parallel parked w/ another car close behind. In reality, Jerry cans rarely get used so I decided I didn't want the extra "gadget" bolted on to the outside for a cleaner look. If I need a jerry can, I can strap it to the floor or the roof rack until I eventually install a second long range fuel tank underneath.
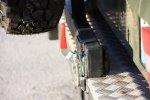
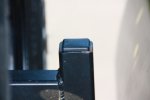
When open, it is held in place by the T-handle pin. The metal is ramped, so the pin glides into place on it's own. When closed, another T-handle pin behaves the same way, and the Destaco latch insures that it doesn't bounce up/down or open.
It's located on the driver side as that interferes the least with driver visibility and is the side that the stock tire is also carried on. The driver biased unmatched OME Extra HD springs seem to handle the extra load well.
The license plate was moved over to the passenger side along with one of it's two lights. The second light will be repurposed as a winch light.
I'm going to live with it through next fall. If I'm stilly happy with it, I'll take it down to get sandblasted/powercoated.
It came out simple and functional, so I'm very happy.
Craig
A huge thanks to Mike Oldani who did almost all the fabrication work even though he was super busy with his final quarter of college. Also thanks to Grant Mossman for helping with the final installation, and Dan Cronin for machining a couple of parts.
In the end I decided to leave off the jerry can holder and go with a 2/3s width arm. The shorter arm will make it easier to open/close when I'm parallel parked w/ another car close behind. In reality, Jerry cans rarely get used so I decided I didn't want the extra "gadget" bolted on to the outside for a cleaner look. If I need a jerry can, I can strap it to the floor or the roof rack until I eventually install a second long range fuel tank underneath.
When open, it is held in place by the T-handle pin. The metal is ramped, so the pin glides into place on it's own. When closed, another T-handle pin behaves the same way, and the Destaco latch insures that it doesn't bounce up/down or open.
It's located on the driver side as that interferes the least with driver visibility and is the side that the stock tire is also carried on. The driver biased unmatched OME Extra HD springs seem to handle the extra load well.
The license plate was moved over to the passenger side along with one of it's two lights. The second light will be repurposed as a winch light.
I'm going to live with it through next fall. If I'm stilly happy with it, I'll take it down to get sandblasted/powercoated.
It came out simple and functional, so I'm very happy.
Craig
Attachments

Last edited:
craig
Supporting Sponsor, Overland Certified OC0018
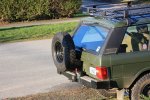
Thanks man. It's an ARB rear bumper (the sticker was torched during welding). Earlier in this thread I posted a link to a blog entry showing how we modified it and mounted the spindle for the swing out.
I prefer it w/o the side trim, but my paint was wasted underneath. This truck has clearly seen plenty of dirt roads that threw lots an lots of gravel up and under the trim. No worries though. This is purely a trail truck, and a dark colored truck in the PNW is going to get seriously pinstriped anyway. Apparently, this truck is going to have some "character".")
I prefer it w/o the side trim, but my paint was wasted underneath. This truck has clearly seen plenty of dirt roads that threw lots an lots of gravel up and under the trim. No worries though. This is purely a trail truck, and a dark colored truck in the PNW is going to get seriously pinstriped anyway. Apparently, this truck is going to have some "character".
Last edited:
craig
Supporting Sponsor, Overland Certified OC0018
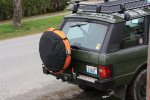
Spare Tire Cover / Recovery Gear Storage
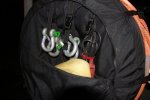
Added a tire cover with integrated recovery gear storage. This makes it possible to get to the basic recovery gear w/o having to open the rear swingout or hatch. If your truck is teetering on the side of the trail about to rollover, the last thing you want to have to do is shift a lot of weight around (like a tire on a swingout). It's also just plain convenient. They also have a series of straps around the outside that can be used to secure a muddy recovery strap, tire chains, or other items you might want to wrap around the tire.
This one is called the Pakkratt. They normally come with a large logo that I wasn't particularly fond of. Fortunately, they also sell them logo-delete and that seems to fit with the character of the RRC. Functionally, it rocks. Very convenient.
Attachments
Last edited:
craig
Supporting Sponsor, Overland Certified OC0018
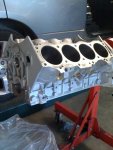
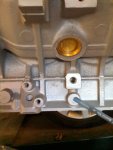
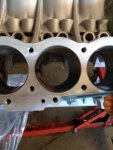
Well, the siren song of the Rover V8 has woo'd me again. My good friend Scott Williams, at Land Rover Spokane, made me an offer I couldn't refuse to rebuild the 3.9l engine. The block just got back from machining today and I'll be ordering up the parts so Scott can get started re-assembling it tomorrow. This offer was just too good to turn down. The idea of having my truck sitting there for another summer when my son has been asking me to go camping for over 2 years now (since the DII broke) is just too much. So, another gigantic thank you goes out, this time to Scott Williams. You're making it possible for us to get out there this summer. WAY COOL!
BIG THANKS from me and Soren!! You're a great guy.
Details from Scott on the rebuild... "The build is fairly basic, nothing too silly. Completely rebuilt 3.9L high compression block. Late model heads milled .020. 4.2L camshaft and that's it. A nice gain over a LC 3.9L fitted in the RRC."
BIG THANKS from me and Soren!!
You're a great guy.Details from Scott on the rebuild... "The build is fairly basic, nothing too silly. Completely rebuilt 3.9L high compression block. Late model heads milled .020. 4.2L camshaft and that's it. A nice gain over a LC 3.9L fitted in the RRC.
"craig
Supporting Sponsor, Overland Certified OC0018
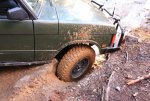
The truck came stock with a set of sliders. Until yesterday I hadn't put any serious weight on them. On the way up, this rock tested the driver side slider, and on the way down the passenger side. Both sliders pass the test and will receive fresh paint as their reward.
Attachments
Last edited:
rover4x4
Adventurer
I am running a 230, it pulls strong off the line and sounds good. I had the heads ported and matched the intake gaskets. Best to call D&D Fabrications, he will have what you need aluminiumv8.com. Some people suggest the use of billet rocker arm stands with the 230 and cutting down the valve guides. The 229 doesnt need these modifications, D&D can steering in the correct direction
jeff_wright
Adventurer
Craig,
Looking forward to how your engine work turns out. I have a worn out 4.0 in my Disco and decided to get another daily driver for the time being till I can do a TDI swap as well. A summer without the Rover is almost prompting me to put in a rebuilt motor for the time being. Best of luck!
Jeff
Looking forward to how your engine work turns out. I have a worn out 4.0 in my Disco and decided to get another daily driver for the time being till I can do a TDI swap as well. A summer without the Rover is almost prompting me to put in a rebuilt motor for the time being. Best of luck!
Jeff
Forum statistics
Members online
- Seandh
- HakanS
- Pflynn1
- jgallo1
- Maddmatt
- RBsaur
- jebaker
- catalyzer
- IdaSHO
- flydream
- Hoov
- LivinAnAdvntr
- CJD
- Ferjablito
- driller
- Golf286
- MisterSmith
- the deputy
- halseyt
- SnoopisTDI
- Delsh
- lawless1
- mmth_ski_bum
- Hank Scorpio
- parabolD
- dalingsco
- redthies
- Ramairgto72
- leunam
- Romer
- TexasD-90
- claymond
- Drive75
- mexica
- paperracquet
- Tbinvb
- wingate
- Parkrider
- Victorian
- moorejames
- dizzydom
- Obsessed2findARuggedHybid
- mark5280
- colby1979
Total: 661 (members: 49, guests: 612)